
Diving into Reactive

2019년 11월 19일 Pivotal Summit 2019 Seoul 행사가 있었다.
마크 헤클러의 Diving into Reactive 세션에서 RSocket을 이용한 Spring Reactive Stream을 라이브 코딩으로 구현하는 시간이 있었는데, 매우 흥미롭고 재미있었다. Spring에서 RSocket을 이용해 얼마나 쉽게 Reactive Stream을 구현할 수 있는지 잘 보여주는 세션이었던거 같았지만, 시간 관계상 마무리가 조금 부족했다.
그 아쉬움을 달래고자 세션 마지막 장에 있는 데모소스를 들여다보기로 했다.
(원래 조쉬 롱이 발표하기로 했던 세션이었는데, 사정상 마크 헤클러가 대신하게 됐다고 한다.)
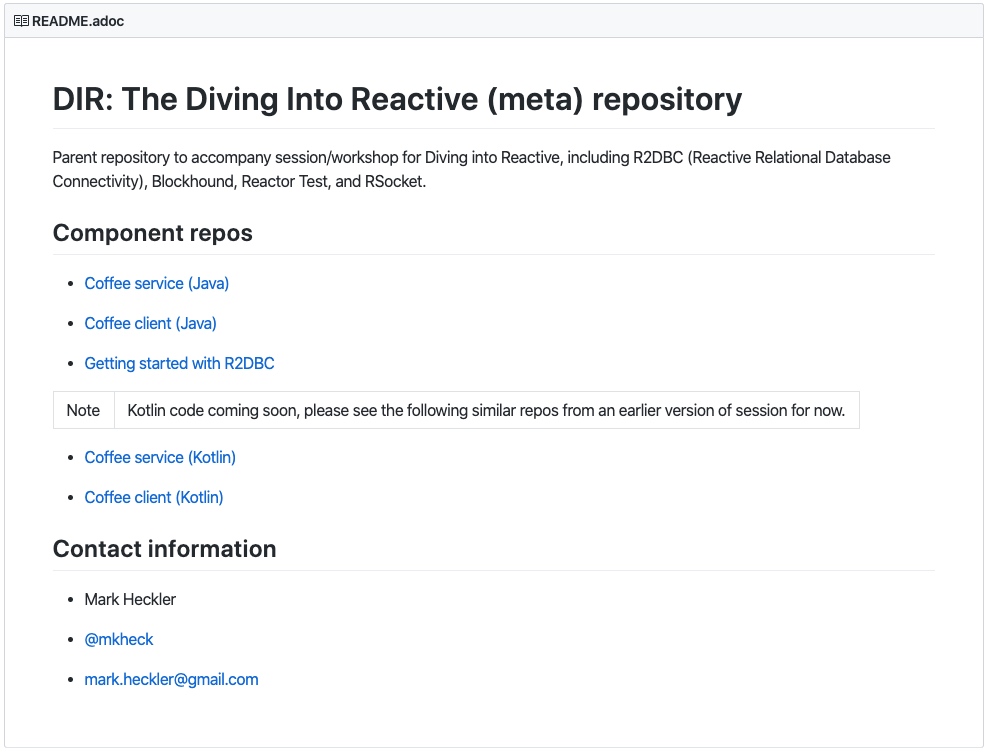
친절하게 Java와 Kotlin 소스를 다 제공해 주는 줄 알았는데, Kotlin 소스는 아니었…
이번 기회에 기억속에서 잊혀지고 있는 Kotlin으로 실습을 해볼까 한다.
내 기억이 맞다면 Spring Framework 5부터는 Kotlin을 정식 지원한다고 했으니, 동영상을 보면서 Kotlin으로 구현해도 별 문제가 없을 것 같다.
1. Spring Boot Module 생성
예제는 coffee-service와 coffee-client 두개의 모듈로 구성된다.
두 모듈 간에 WebClient를 이용한 연동 예제와 RSocket을 이용한 연동 예제로 나누어 진행하겠다.
먼저 모듈을 생성해보자.
마크 헤클러는 Spring Initializr를 사용했지만, IntelliJ에서도 모듈을 생성할 수 있기 때문에 IntelliJ의 기능을 이용해보자.
coffee-service
 Type은 Maven, Language는 Kotlin을 사용했다.
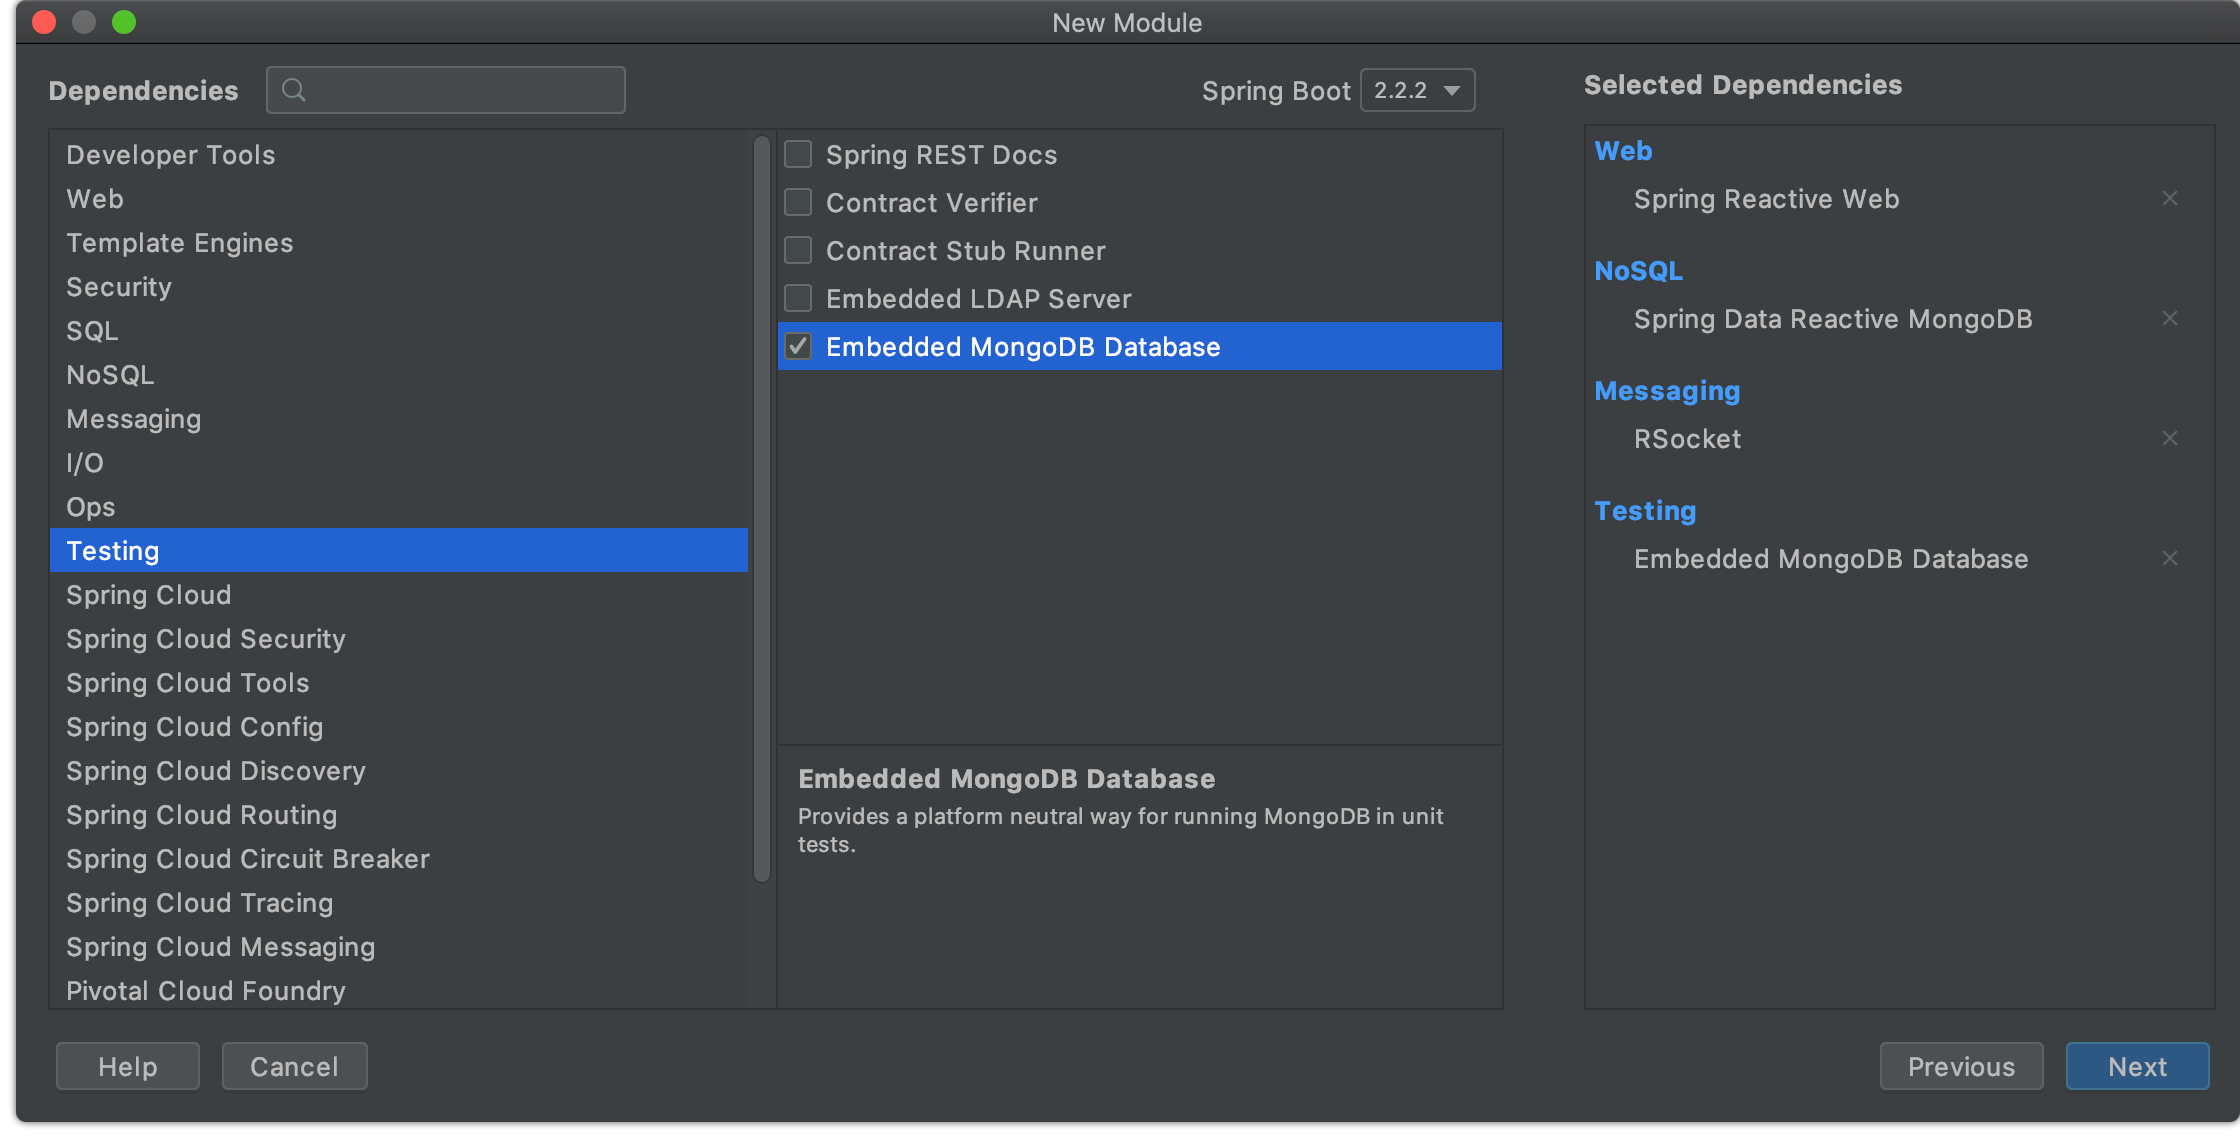 Spring Boot 2.2.2
Spring Reactive Web
Spring Data Reactive MongoDB
RSocket
Embedded MongoDB Database
coffee-client
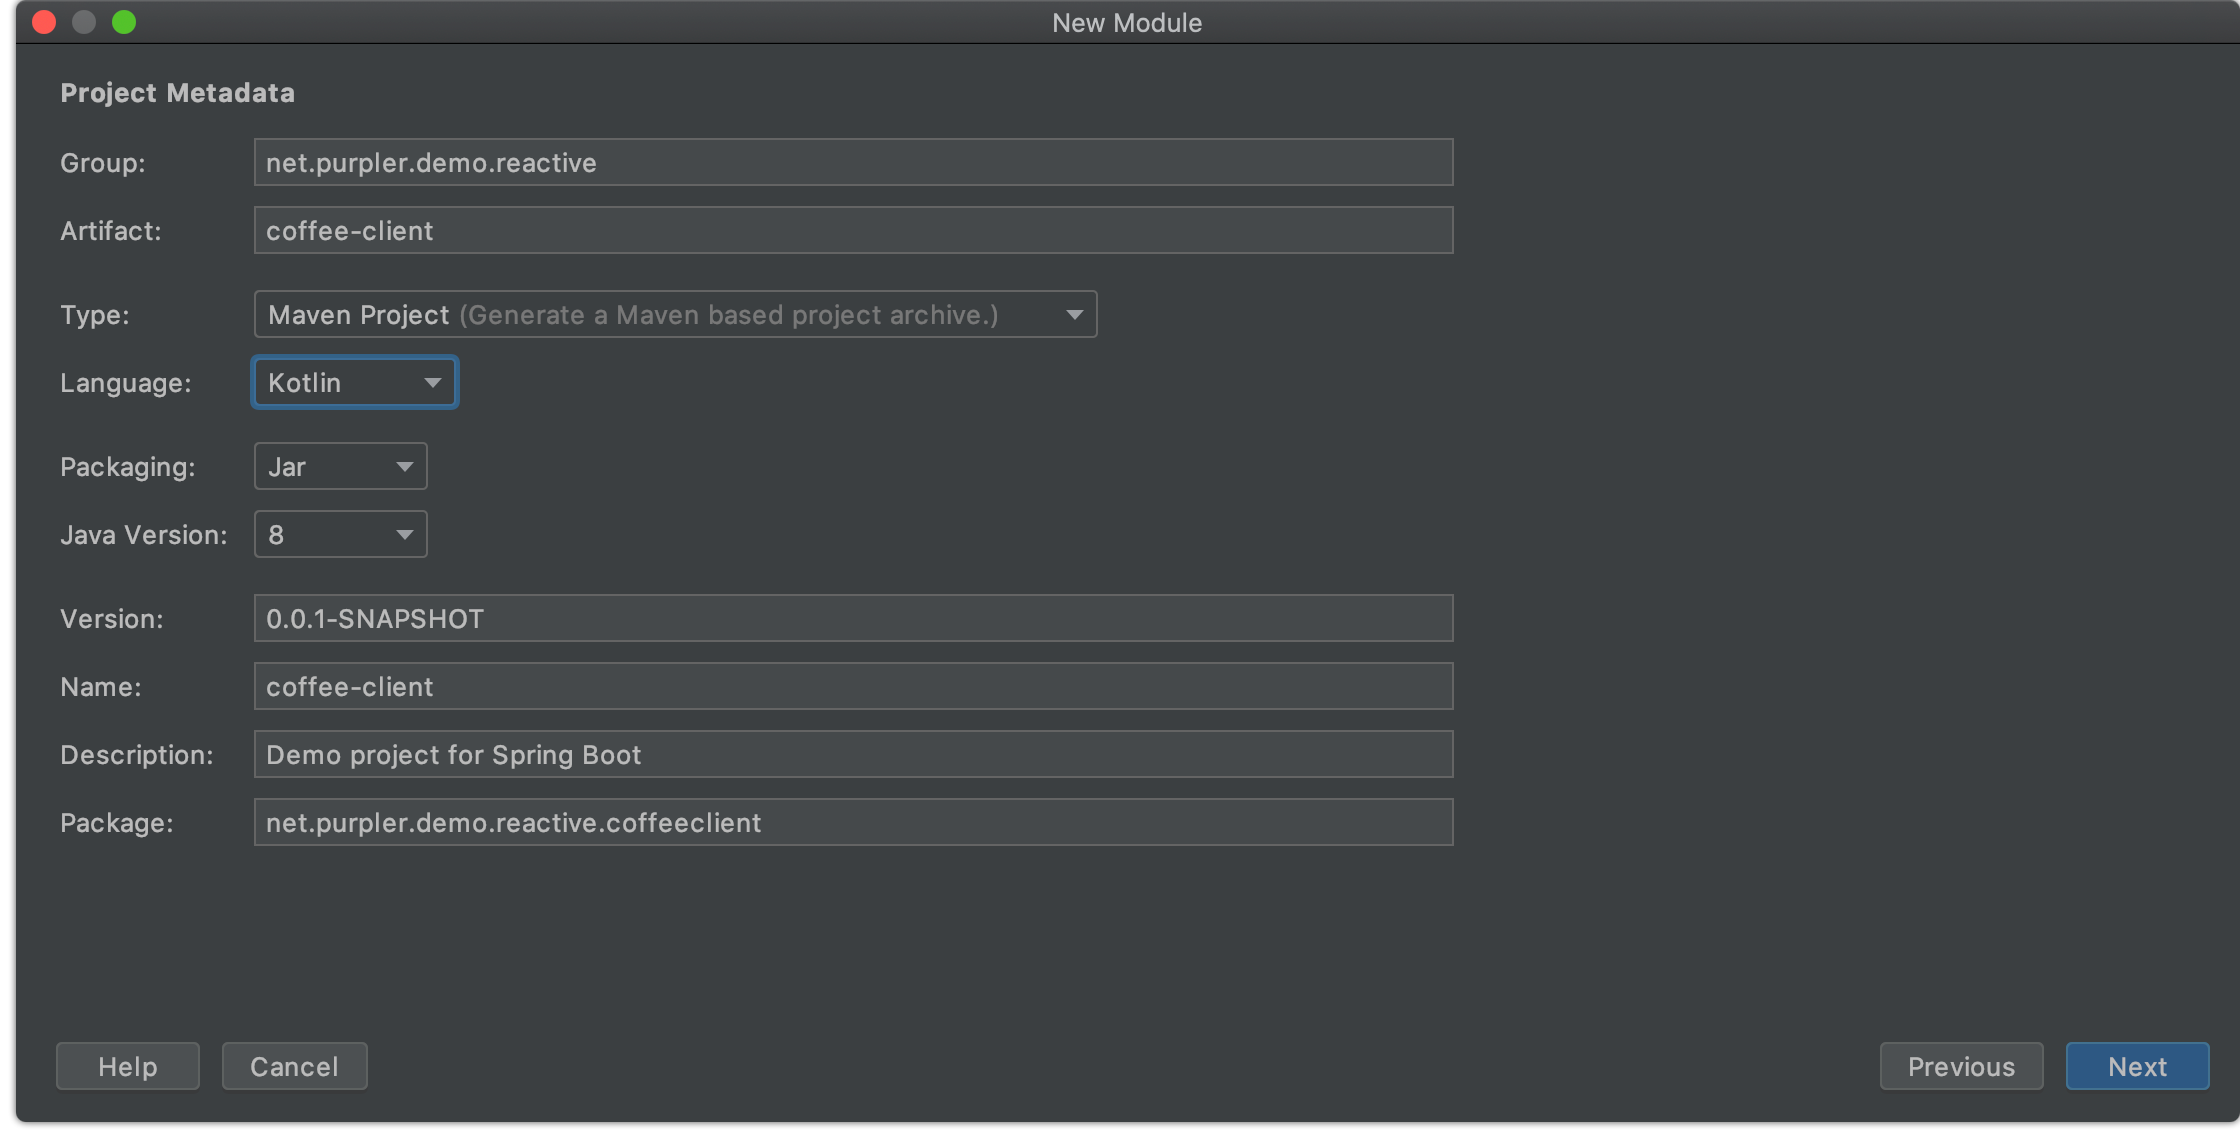
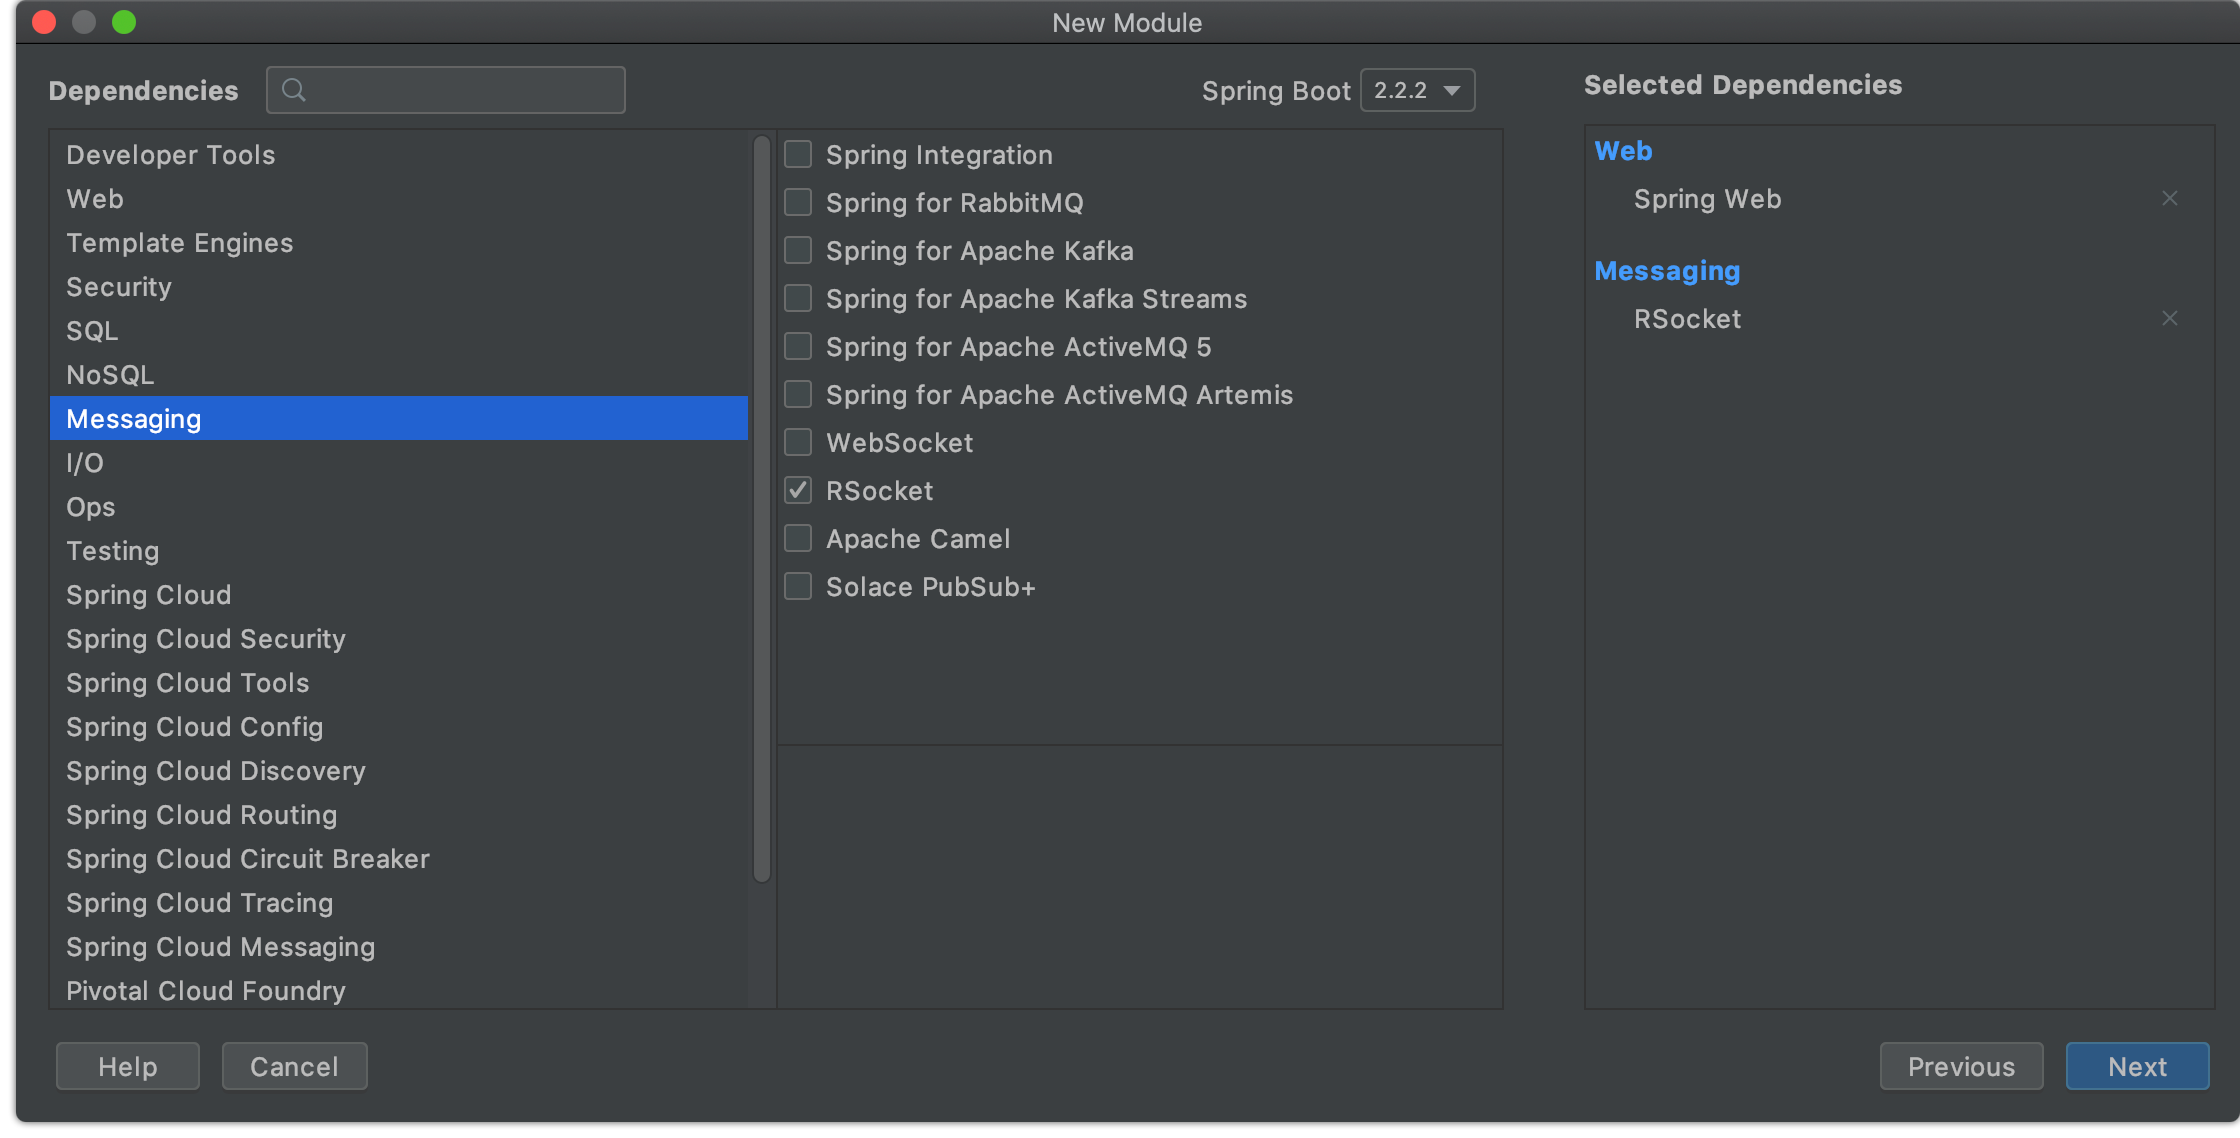 이번에는 Spring Reactive Web와 RSocket만 선택했다.
영상에서는 Lombok을 사용했지만, Kotlin은 Lombok을 사용 할 필요가 없기 때문에 선택하지 않았다.
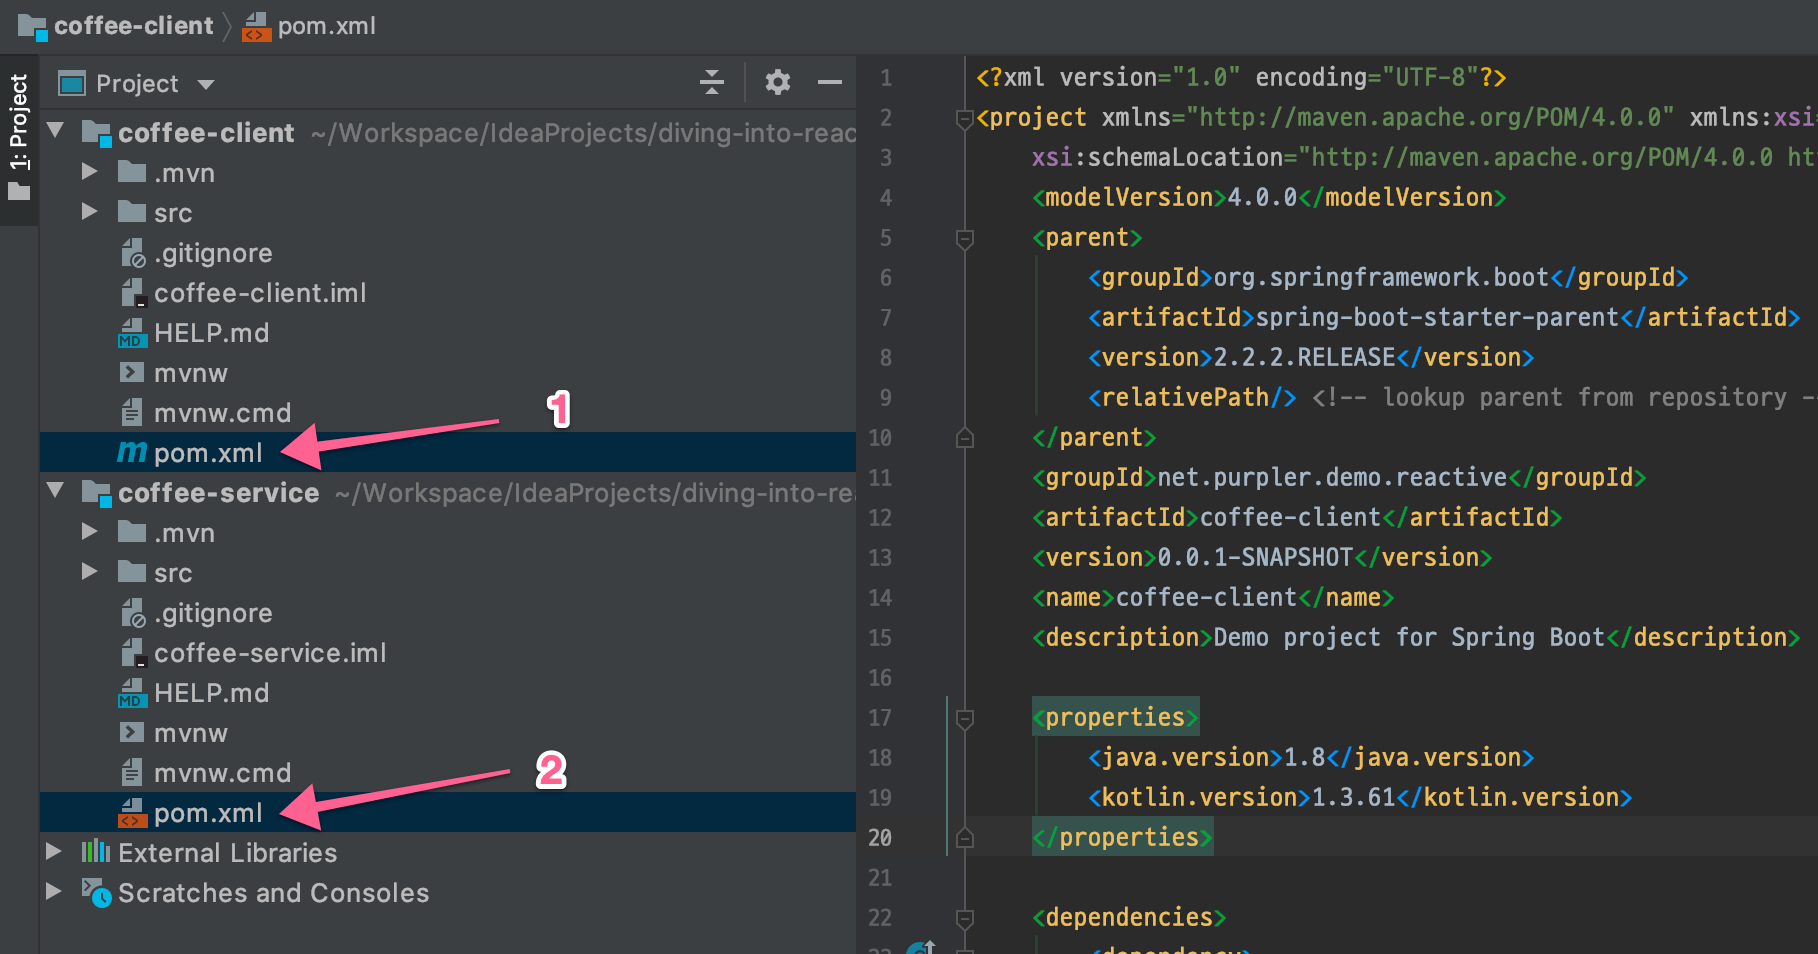 (1), (2)번의 아이콘 모양을 보면 하나는 Maven, 다른 하나는 Maven이 아니다.
사실 둘 다 maven 프로젝트로 표시되지 않아서, (1)번을 수동으로 maven 프로젝트로 변경시켰다.
IntelliJ의 버그가 아닌가 싶다.
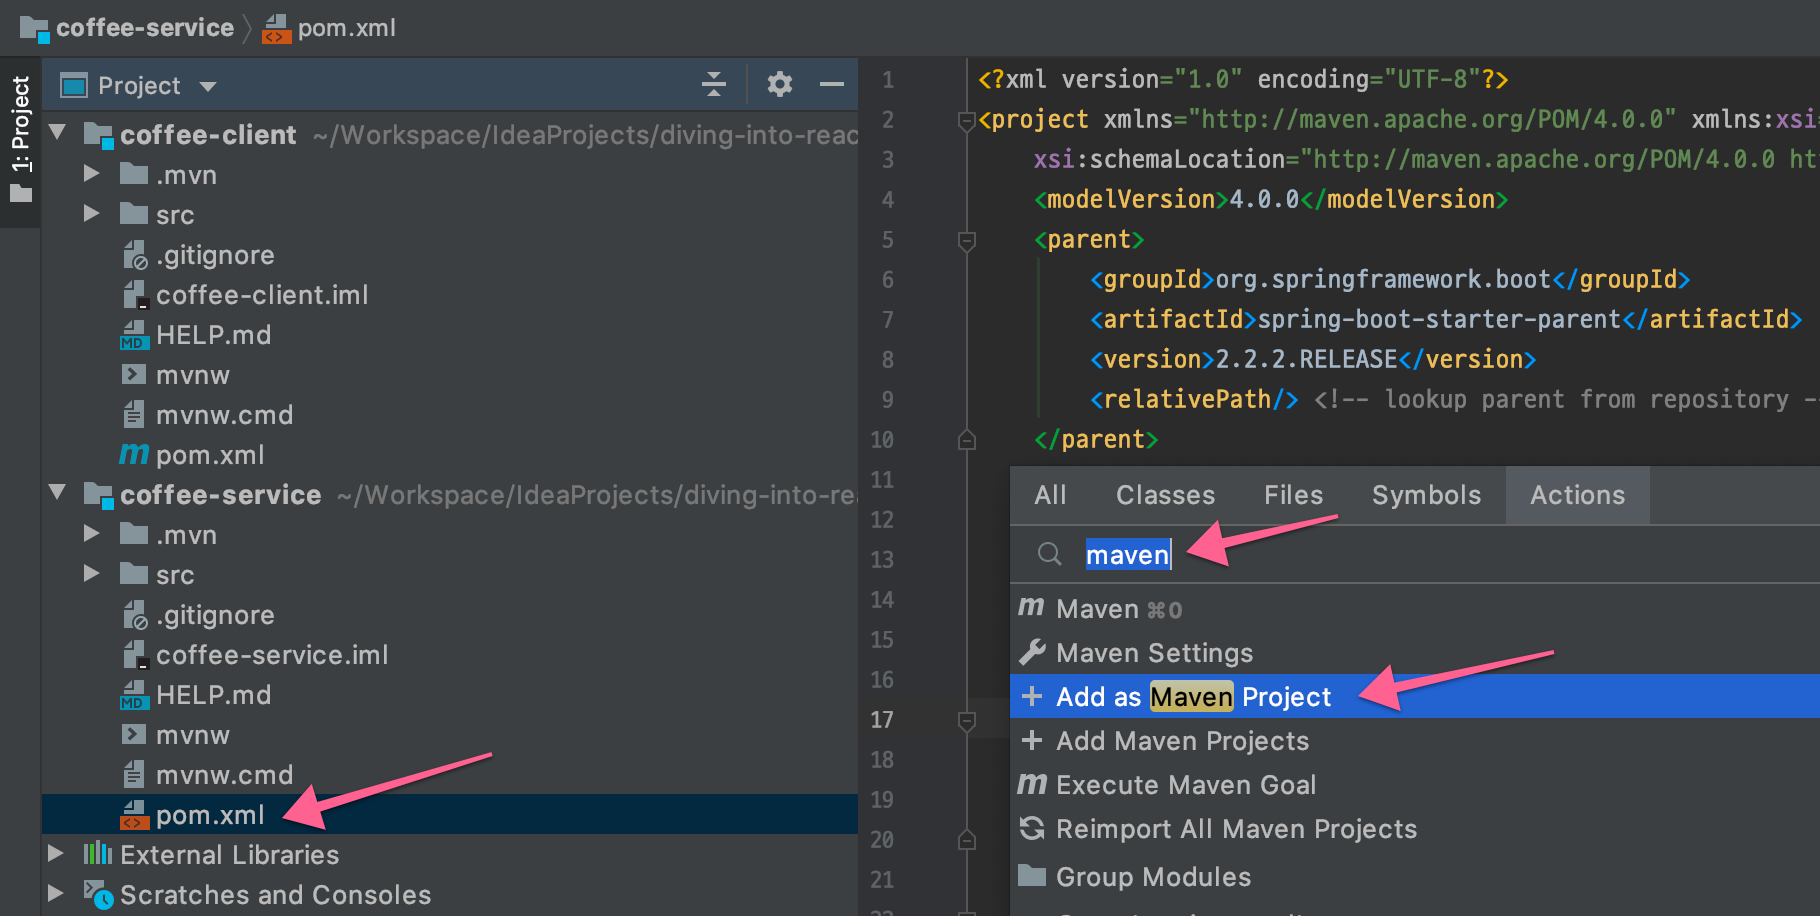 Maven 프로젝트로 변경시키는 방법은
- pom.xml 파일을 선택하고
- shift를 두 번 빠르게 누르면, 창이 뜬다 (창 이름을 잊어버렸다)
- maven으로 검색하면
Add as Maven Project선택
자.. 이제 코딩 할 준비가 다 되었다.
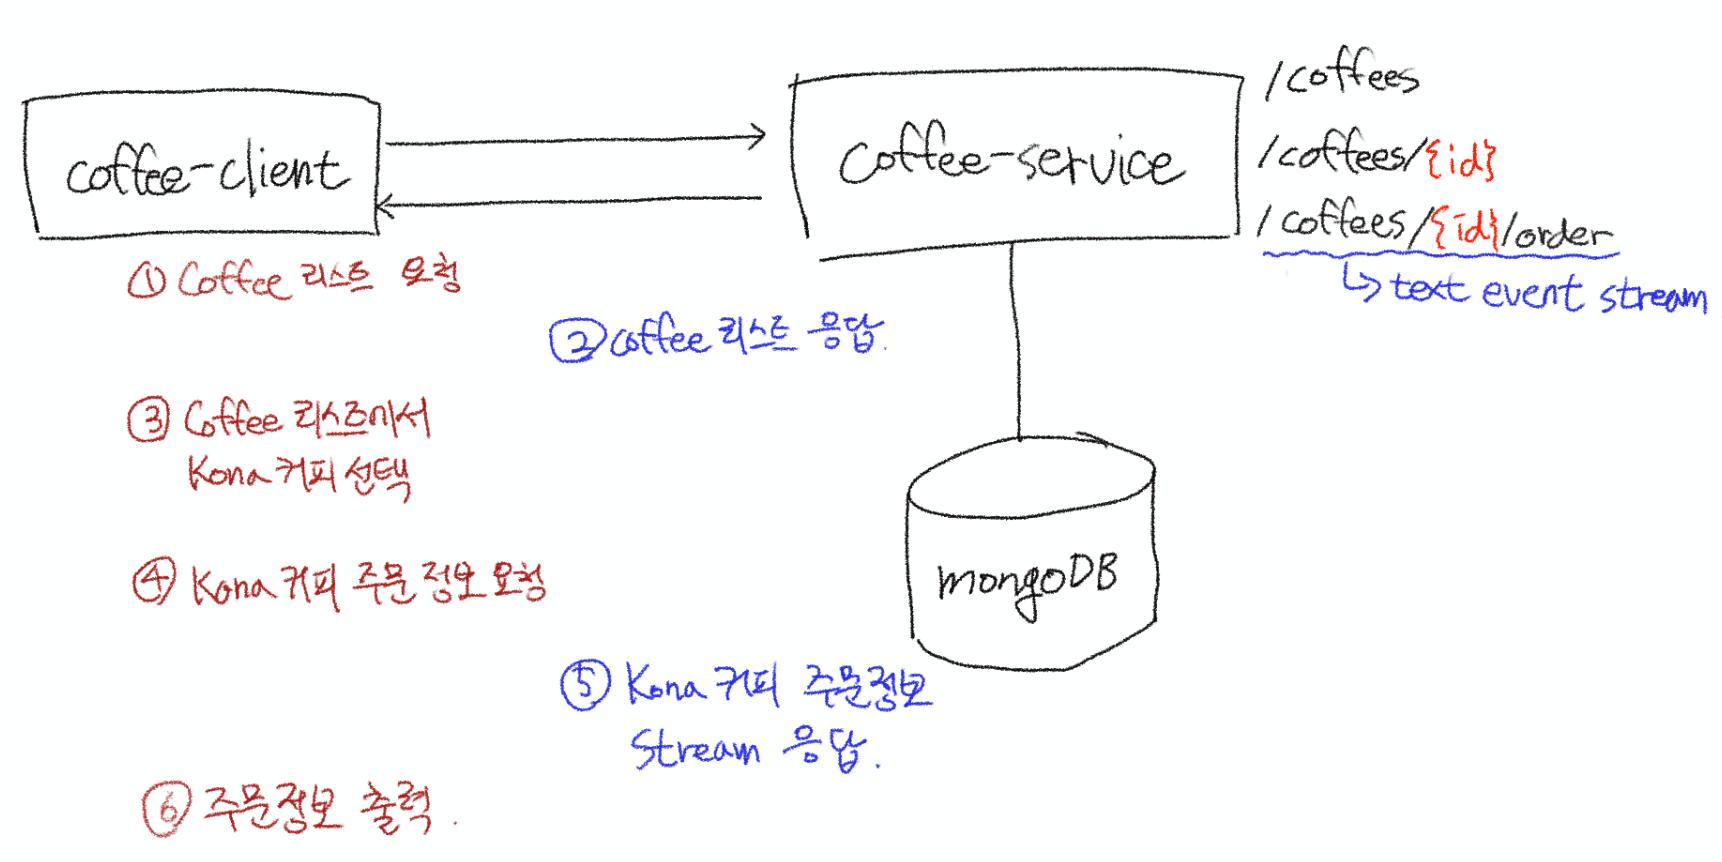
2. 구조 분석
이 데모예제는 2가지 방식으로 구현하는 것을 보여준다.
- WebClient 방식
- RSocket 방식
WebClient는 RestTemplate의 Reactive 버전이라고 보면 된다. 물론 HTTP 기반이다.
RSocket은 마이크로서비스 간 통신에 주로 쓰이는 프로토콜인데, OSI 5/6계층을 사용하며, Full-Duplex 연결을 지원한다. 즉, 한 번 연결이 되면 서버에서도 클라이언트에 요청을 보낼 수 있다. 브라우저와 통신하는 경우 WebSocket을 이용하면 된다.
coffee-service는 MongoDB를 이용해 Coffee 정보를 관리하며, Coffee 리스트, Coffee 조회, Coffee 주문 조회 등의 기능을 제공한다.
coffee-client는 coffee-service에 Coffee 리스트를 요청하거나, 주문 정보를 요청하는 기능을 갖고 있다.
3. WebClient를 이용한 방식
coffee-service
우선 coffee-service에 Coffee와 CoffeeOrder를 추가해 보자. data class로 추가하자.
1
2
3
4
5
6
7
8
9
10
11
@Document
data class Coffee(
	@Id
	val id: String?,
	val name: String
)

data class CoffeeOrder(
	val coffeeId: String,
	val whenOrdered: Instant
)
@Document는 Spring Data MongoDB에서 사용되는 entity라는 표시이며, @Id는 key를 의미한다. id는 MongoDB에서 자동으로 생성해준다.
이제 MongoDB를 사용하기 위한 설정이 필요하다.
우선 Test용으로 추가시켜준 Embedded MongoDB를 Test가 아닌 환경에서도 실행될 수 있도록 pom.xml의 dependency 정보를 수정해 준다.
1
2
3
4
5
<dependency>
	<groupId>de.flapdoodle.embed</groupId>
	<artifactId>de.flapdoodle.embed.mongo</artifactId>
	<!--<scope>test</scope>-->
</dependency>
test scope로 지정된 부분을 주석으로 처리했다.
이제 CoffeeRepository를 추가하자.
1
2
interface CoffeeRepository: ReactiveCrudRepository<Coffee, String> {
}
이제 coffee-service가 실행되면서 커피 정보가 초기화 되도록 DataLoader를 만들자.
1
2
3
4
5
6
7
8
9
10
11
12
13
14
@Component
class DataLoader(private val repo: CoffeeRepository) {

	@PostConstruct
	fun loadData() {
		println("### load Datas......")
		repo.deleteAll() // 기존 데이터는 일단 지우고..
			.thenMany(Flux.just("Cafe Cereza", "Don Pablo", "Sumatra", "Kaldi", "Kona") // 이 이름들로 커피 정보를 생성 할 것이다.
				.map { Coffee(null, it) } // Flux를 통해 들어오는 커피이름으로 Coffee 정보를 생성한다.
				.flatMap { repo.save(it) }) // 그리고 MongoDB에 저장
			.thenMany(repo.findAll()) // 저장이 잘 됐는지 전체 데이터를 조회해서
			.subscribe { println("### $it") } // 출력한다.
	}
}
Reactor에 익숙하지 않다면 알아보기 힘든 코드지만, 주석에 다 나와있으니 어렵지 않을 것이다.
이제 MongoDB에 데이터가 잘 저장되는지 확인해 보자.
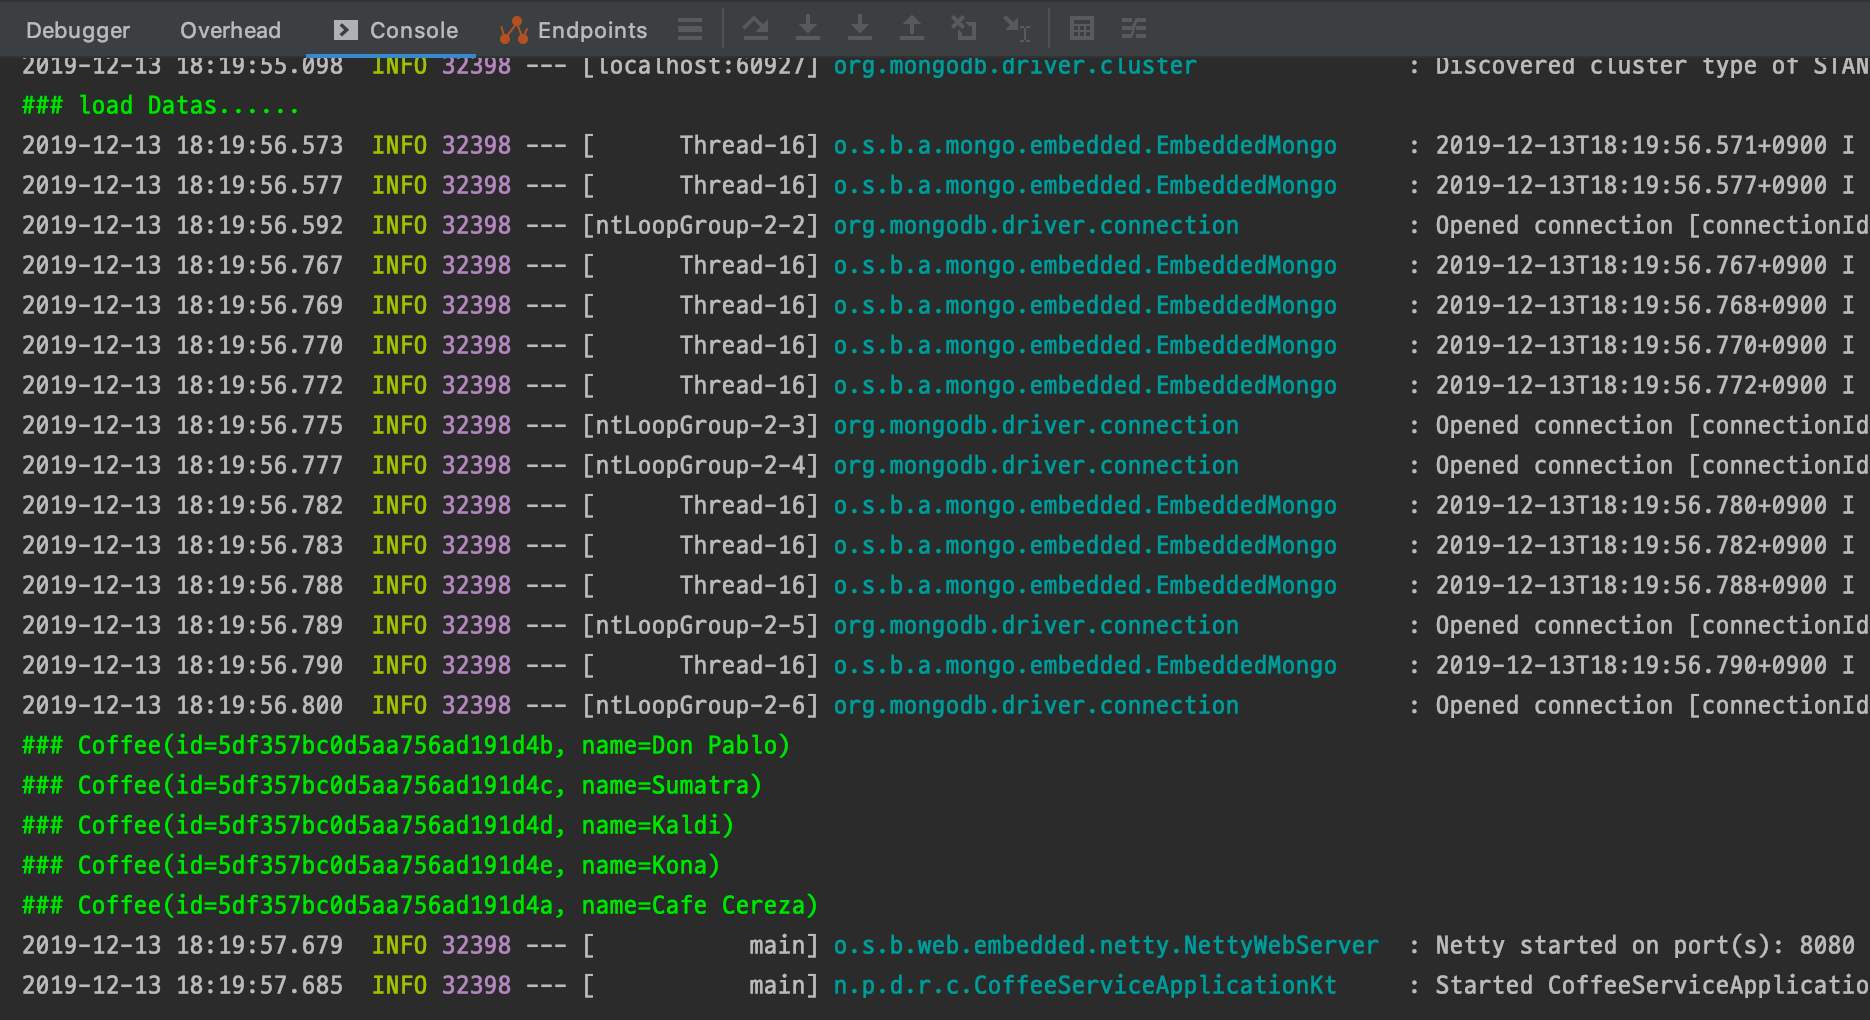 이렇게 나왔다면 성공이다.
이제는 CoffeeService를 만들어보자.
1
2
3
4
5
6
7
8
9
10
11
12
13
14
15
16
17
@Service
class CoffeeService(private val repo: CoffeeRepository) {

	fun getAllCoffees(): Flux<Coffee> {
		return repo.findAll()
	}

	fun getCoffeeById(id: String): Mono<Coffee> {
		return repo.findById(id)
	}

	fun getOrdersForCoffee(coffeeId: String): Flux<CoffeeOrder> {
		return Flux.interval(Duration.ofSeconds(1)) // 1초 간격으로 숫자를 발행한다.
			.onBackpressureDrop() // 처리량이 많아서 처리를 못하는 요소는 버린다.
			.map { CoffeeOrder(coffeeId, Instant.now()) } // 주문정보를 생성한다.
	}
}
getOrdersForCoffee가 요청되면, Data Stream이 만들어진다. 즉, 접속이 끊어질때까지 계속해서 메시지를 발행해서 구독자에게 전달한다.
마지막으로 Endpoint가 될 controller를 만들어보자.
1
2
3
4
5
6
7
8
9
10
11
12
13
14
15
16
17
18
19
@RestController
@RequestMapping("/coffees")
class CoffeeController(private val service: CoffeeService) {

	@GetMapping
	fun all(): Flux<Coffee> {
		return service.getAllCoffees()
	}

	@GetMapping("/{id}")
	fun byId(@PathVariable id: String): Mono<Coffee> {
		return service.getCoffeeById(id)
	}

	@GetMapping("/{id}/orders", produces = [MediaType.TEXT_EVENT_STREAM_VALUE]) // Stream으로 데이터를 보낸다.
	fun orders(@PathVariable id: String): Flux<CoffeeOrder> {
		return service.getOrdersForCoffee(id)
	}
}
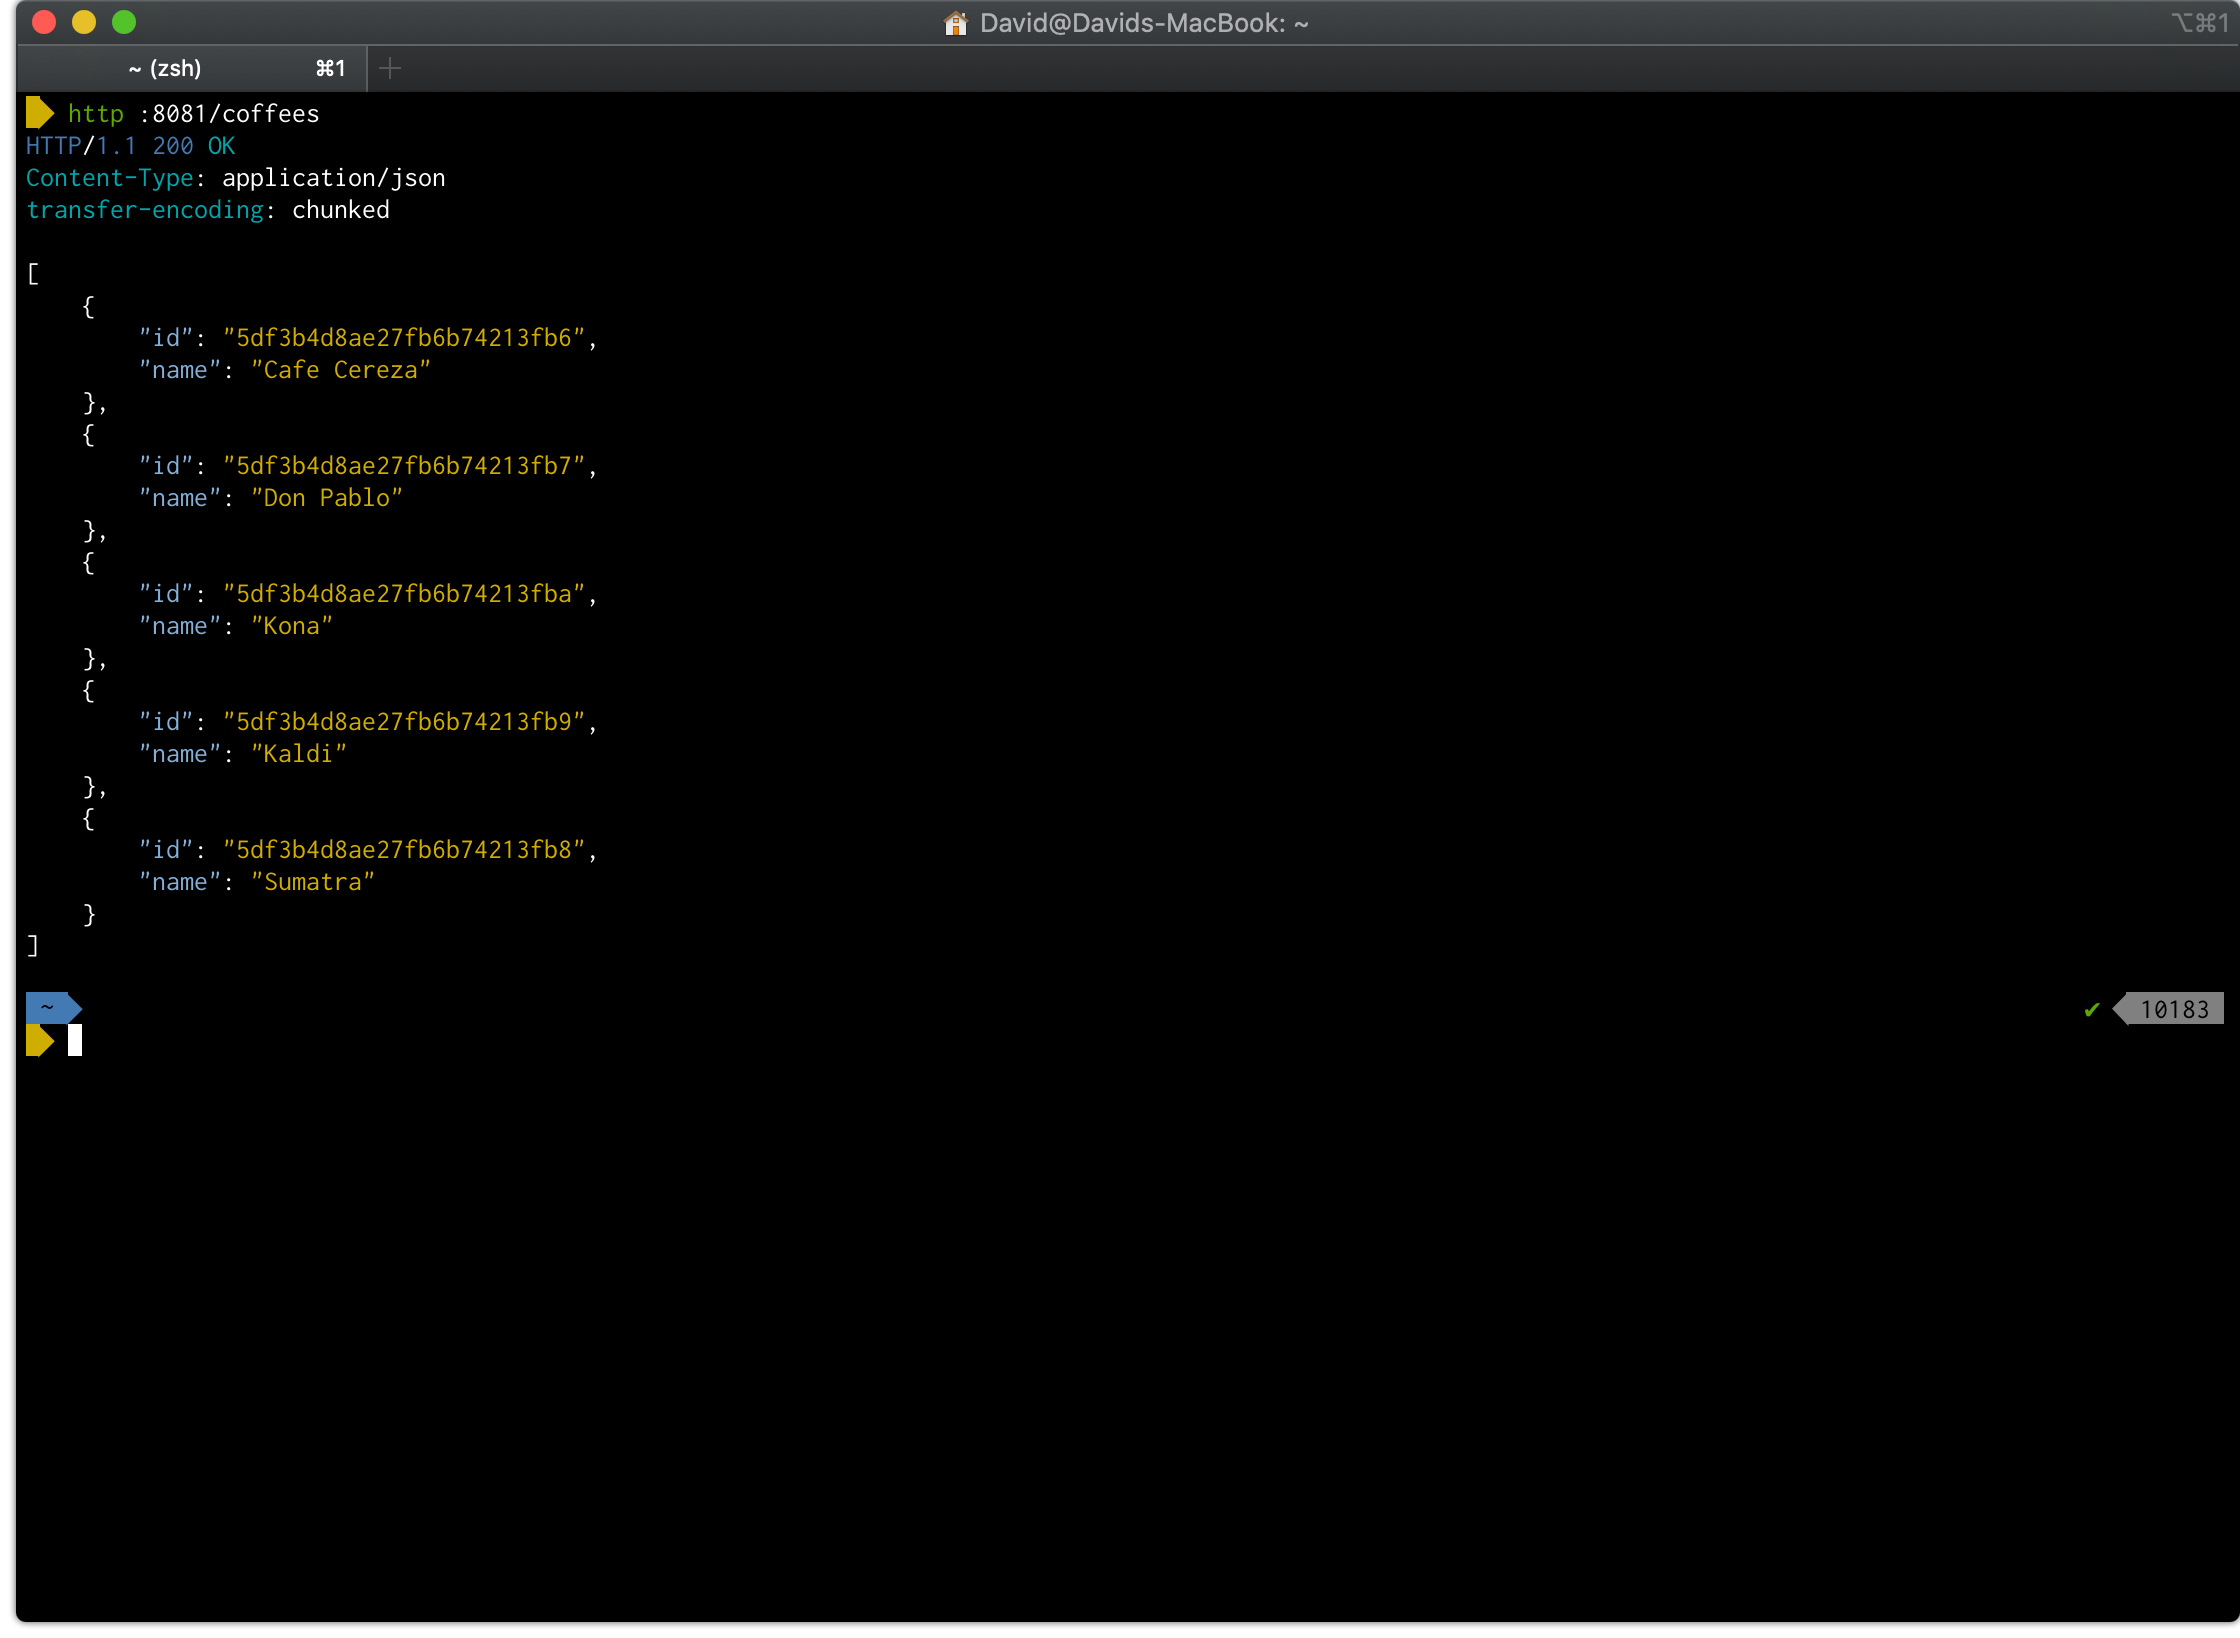
이제 coffee-service를 실행해서 테스트 해보자.
httpie를 사용해서 요청을 보내보자.
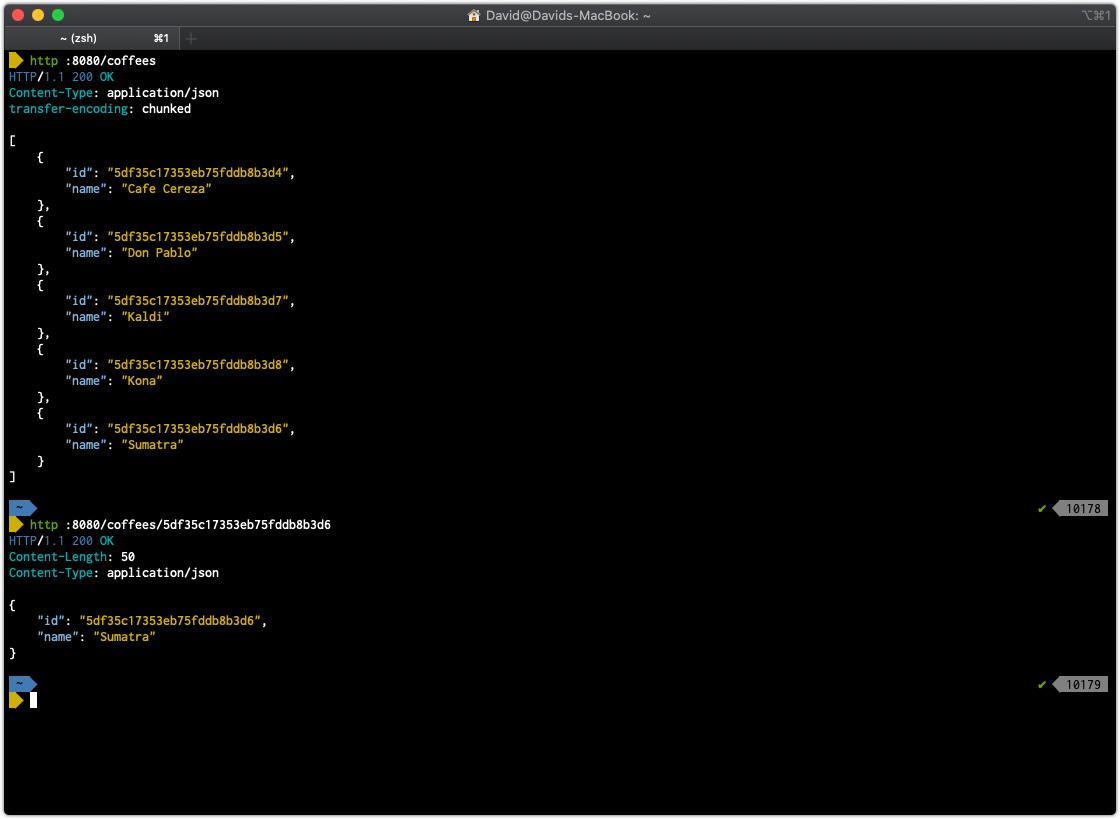 정상이다.
정상이다.
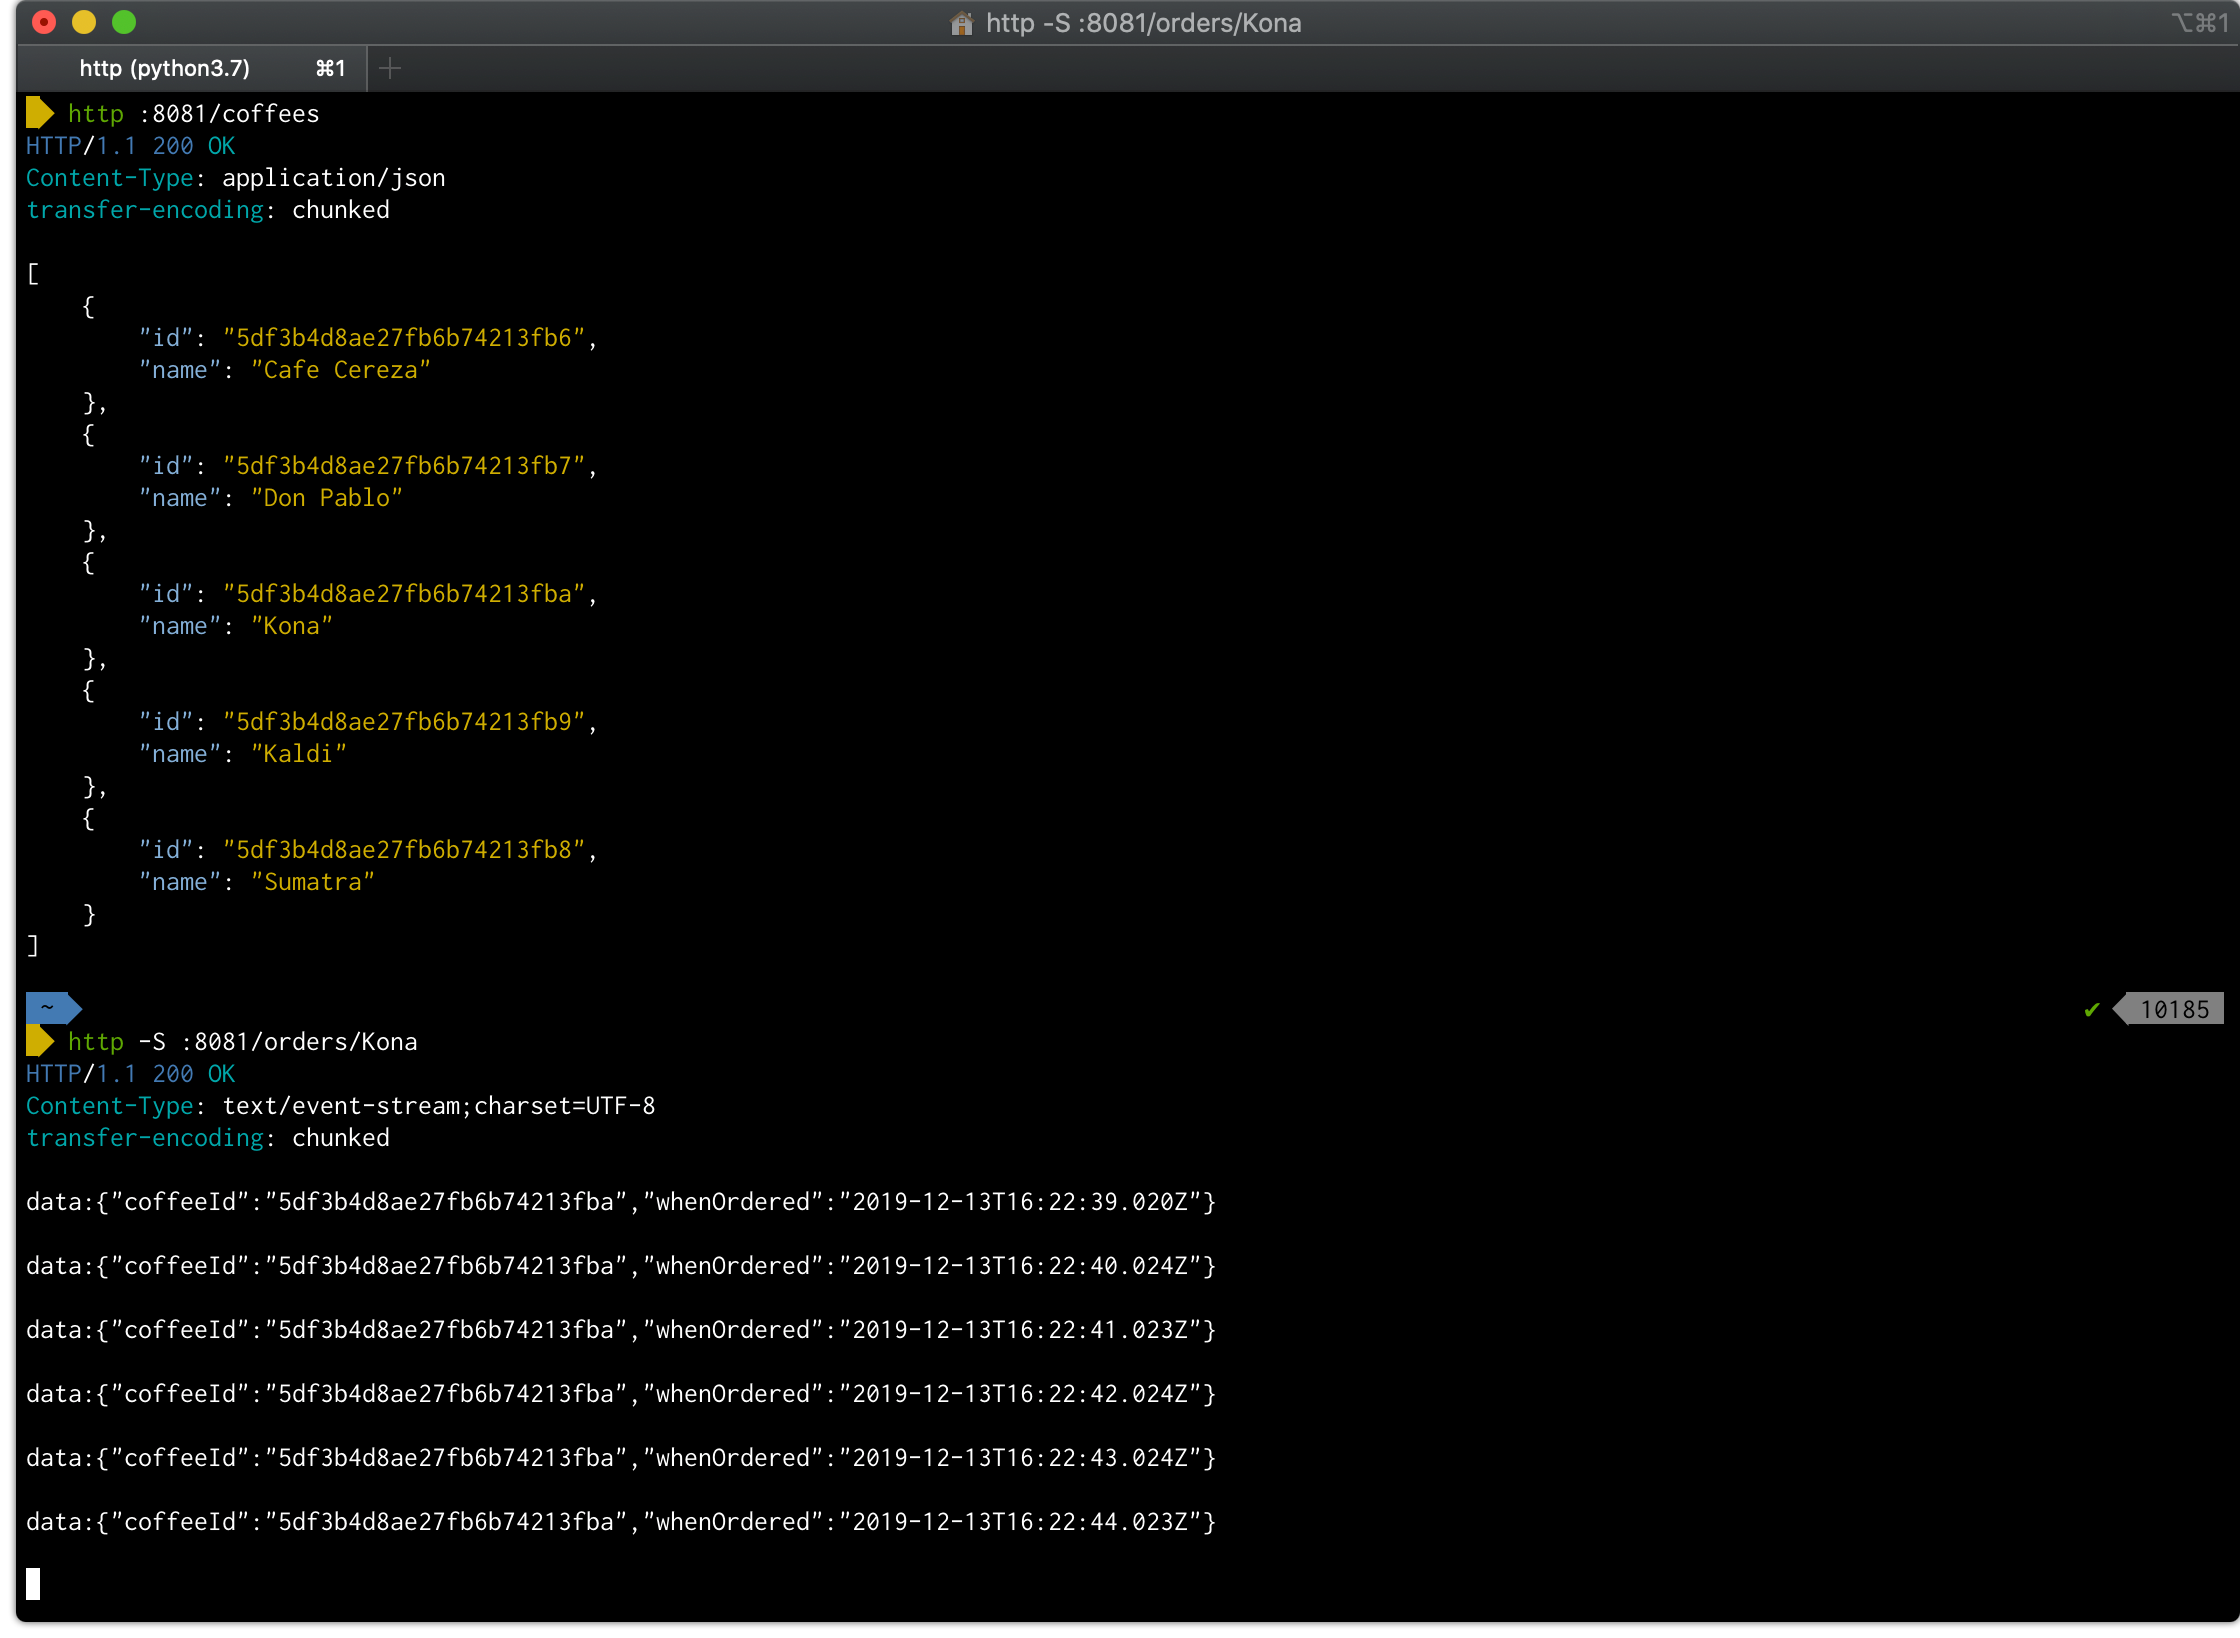
이제 주문정보를 stream으로 받아보자.
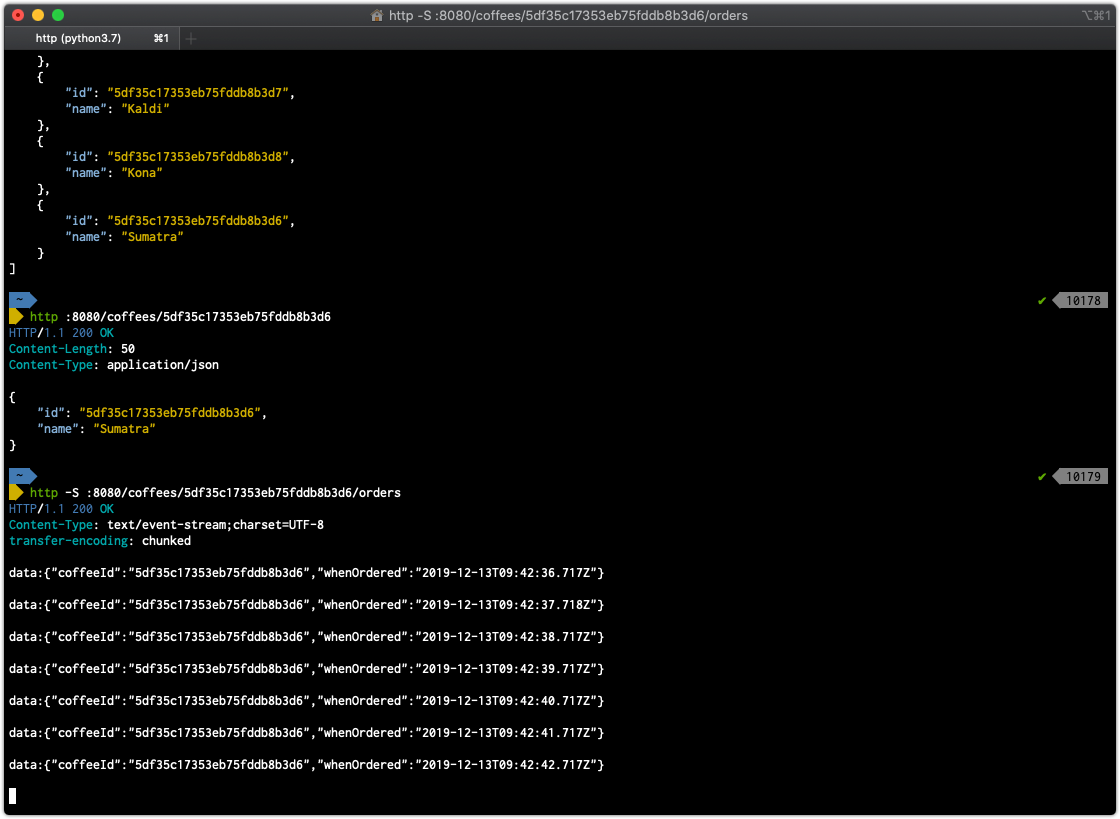 httpie의 -S 옵션을 추가해 줘야한다.
이제 1초에 하나씩 주문정보가 들어온다.
여기까지 서버 역할을 하는 coffee-service를 만들었다.
이제 클라이언트 역할을 하는 coffee-client를 만들어보자.
coffee-client
client도 Coffee 정보와 주문정보를 받아올 수 있는 Model이 있었야 한다.
1
2
3
4
5
6
7
8
9
data class Coffee(
	val id: String,
	val name: String
)

data class CoffeeOrder(
	val coffeeId: String,
	val whenOrdered: Instant
)
WebClient를 사용해야하니 bean을 생성해주자.
1
2
3
4
5
6
7
@SpringBootApplication
class KotlinCoffeeClientApplication {
	@Bean
	fun client(): WebClient {
		return WebClient.create("http://localhost:8080")
	}
}
주문정보를 stream으로 받아볼 TestClient를 만들자.
1
2
3
4
5
6
7
8
9
10
11
12
13
14
15
16
17
@Component
class TestClient(private val client: WebClient) {

	@PostConstruct
	fun letsDoThis() {
		client.get() // get 요청을 보낸다.
			.uri("/coffees") // http://localhost:8080/coffees로 요청을 보낸다.
			.retrieve()
			.bodyToFlux(Coffee::class.java) // response를 이용해 Coffee 정보를 생성한다.
			.filter { coffee -> coffee.name.equals("kona", true) } // Coffee 정보 중에 Kona 커피를 찾는다.
			.flatMap { coffee -> client.get()
				.uri("/coffees/{id}/orders", coffee.id) // http://localhost:8080/coffees/{id}/orders로 요청을 보낸다.
				.retrieve()
				.bodyToFlux(CoffeeOrder::class.java)} // CoffeeOrder 정보를 생성한다.
			.subscribe { println("### $it") } // stream 구독을 시작하고, 전달되는 데이터를 출력한다.
	}
}
그리고 coffee-client를 실행할 port를 바꿔준다. application.yml에 다음 내용을 추가한다.
(application.properties가 기본 파일인데, 확장자만 yml로 바꿨다.)
1
2
server:
  port: 8081
자 이제 실행해보자.
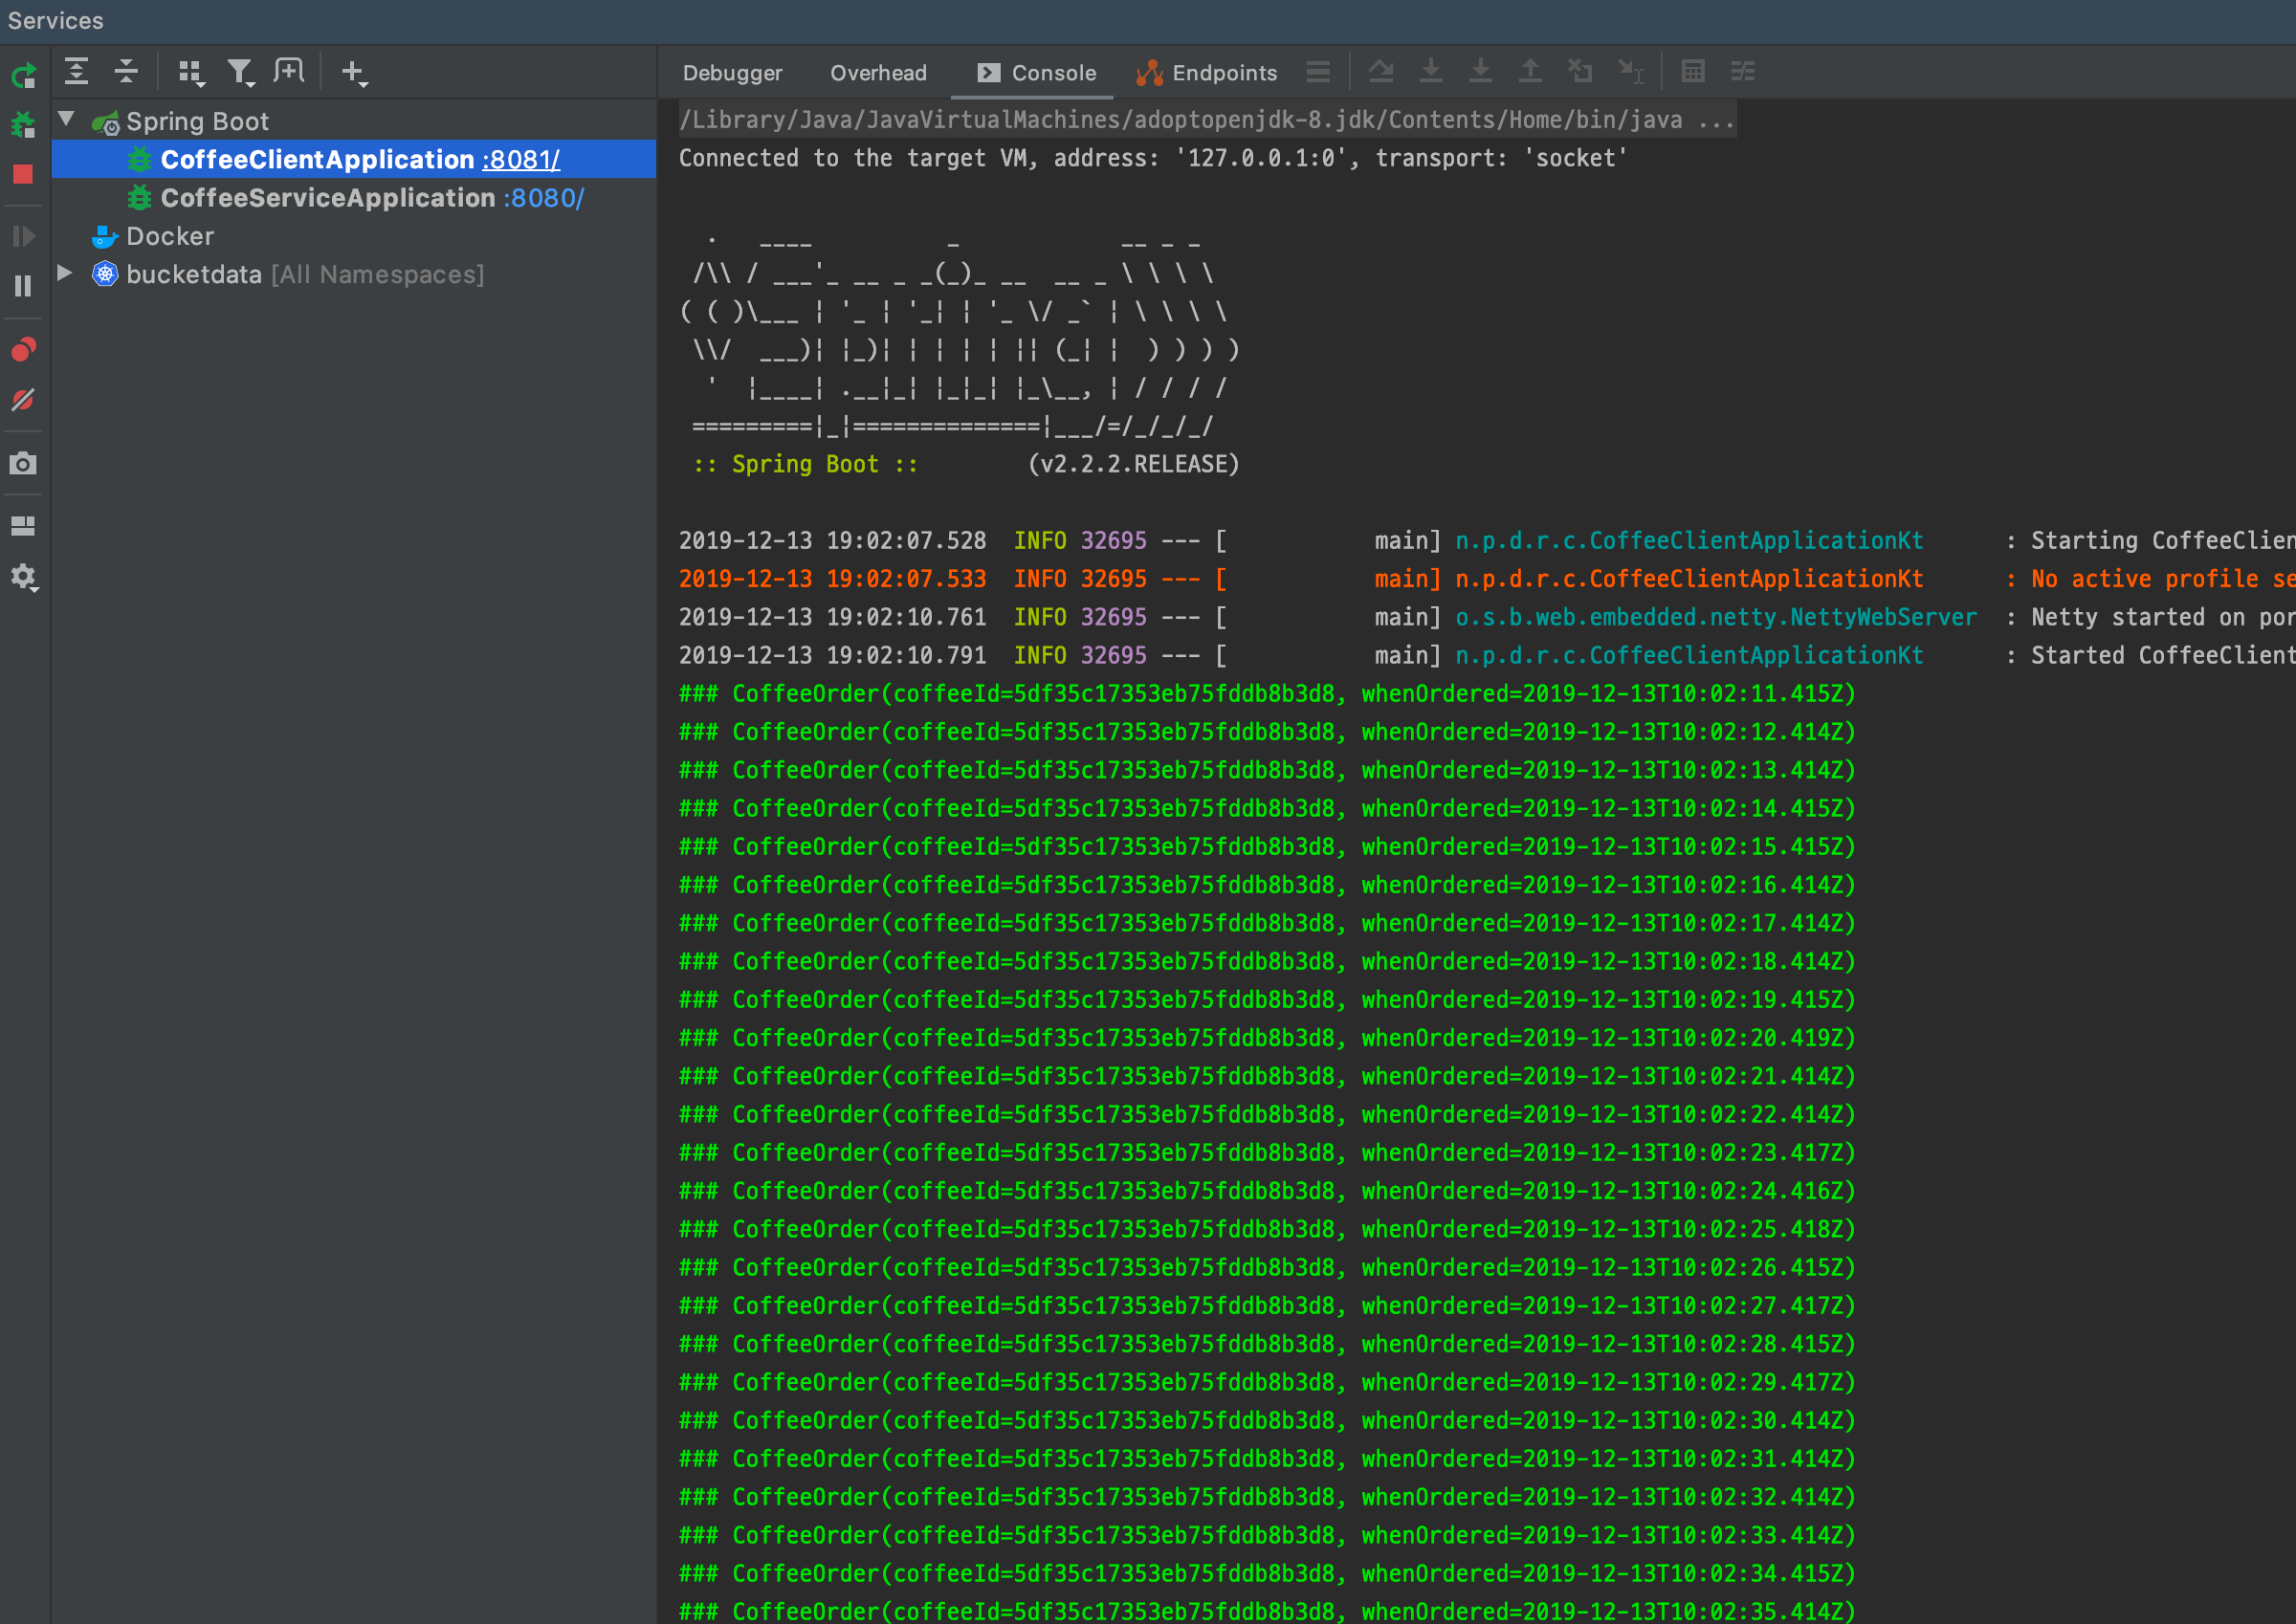
한 번의 요청으로 계속해서 data를 받고 있다.
4. RSocket을 이용한 방식
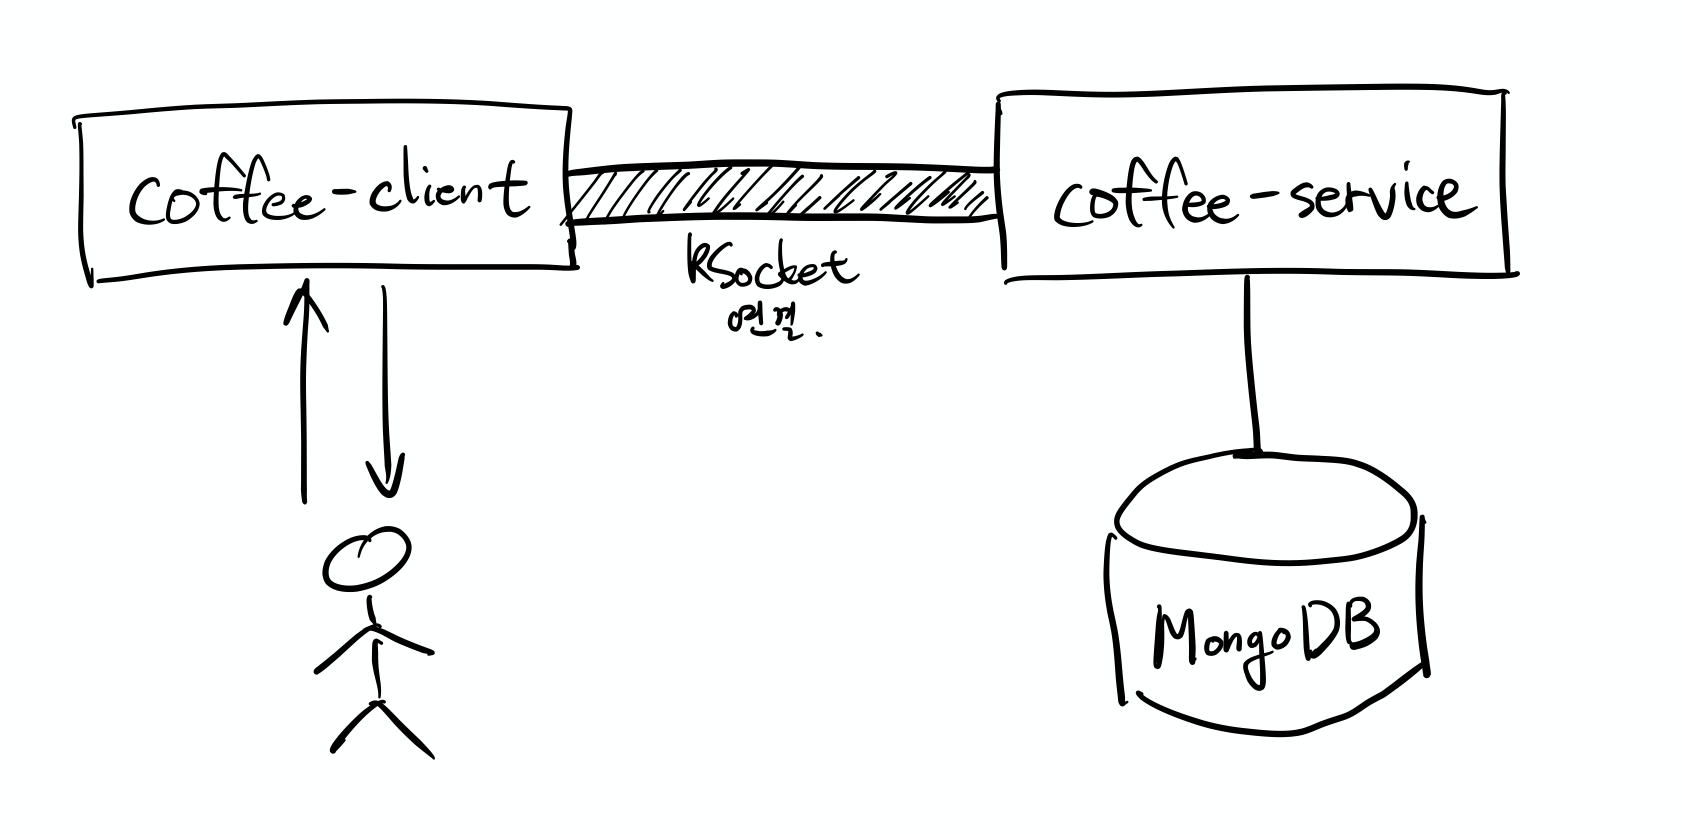
RSocket을 이용해 서비스간 통신을 하는 예제를 실습해 본다.
그림과 같이 사용자는 http 프로토콜을 이용해 coffee-client에 주문정보를 요청하고, 주문정보를 Stream으로 받아볼 수 있다. 하지만, 내부적으로는 coffee-client는 중계지 역할만 할 뿐 실제 데이터는 coffee-service에서 생성되어 발행되고 있다.
coffee-service
RSocket 서버를 시작하기 위해서는 application.yml을 수정해주면 된다.
1
2
3
4
spring:
  rsocket:
    server:
      port: 8901
이렇게 수정한 후 실행해보면
 RSocket Server가 실행된 로그를 확인할 수 있다.
이번 예제는 Coffee의 이름으로 주문내역의 stream을 받아보는 것을 실습해 보는 것이다.
먼저 필요한 것은 MongoDB에 있는 Coffee 정보를 이름으로 검색하는 기능이 필요하다.
CoffeeRepository에 이름으로 검색하는 기능을 추가해준다.
1
2
3
interface CoffeeRepository: ReactiveCrudRepository<Coffee, String> {
	fun findCoffeeByName(name: String): Mono<Coffee>
}
CoffeeService에도 이름으로 검색하는 기능을 추가해준다.
1
2
3
4
5
6
7
8
9
10
11
12
13
14
15
16
17
18
19
20
21
22
23
@Service
class CoffeeService(private val repo: CoffeeRepository) {

	fun getAllCoffees(): Flux<Coffee> {
		return repo.findAll()
	}

	fun getCoffeeById(id: String): Mono<Coffee> {
		return repo.findById(id)
	}

	// 이 부분이 추가됐다.
	fun getCoffeeByName(name: String): Mono<Coffee> {
		return repo.findCoffeeByName(name) // 이름을 검색한다.
			.defaultIfEmpty(Coffee("12345", "My favorite coffee")) // 일치하는 정보가 없으면 기본값을 넘겨준다.
	}

	fun getOrdersForCoffee(coffeeId: String): Flux<CoffeeOrder> {
		return Flux.interval(Duration.ofSeconds(1)) // 1초 간격으로 숫자를 발행한다.
			.onBackpressureDrop() // 처리량이 많아서 처리를 못하는 요소는 버린다.
			.map { CoffeeOrder(coffeeId, Instant.now()) } // 주문정보를 생성한다.
	}
}
그리고 RSocket의 Endpoint를 만들어준다.
1
2
3
4
5
6
7
8
9
10
11
12
13
14
@Controller
class RSController(private val service: CoffeeService) {

	@MessageMapping("coffees")
	fun supplyCoffees(): Flux<Coffee> {
		return service.getAllCoffees()
	}

	@MessageMapping("orders.{name}")
	fun orders(@DestinationVariable name: String): Flux<CoffeeOrder> {
		return service.getCoffeeByName(name)
			.flatMapMany { coffee -> service.getOrdersForCoffee(coffee.id!!) }
	}
}
RSocket의 Endpoint역시 Controller다. 매우 익숙한 형태다.
기존 Spring 기반의 개발자라면 쉽게 접근하기 좋게 만들어졌다.
coffee-client
이번 예제는 WebClient 테스트 부분을 중지시키고 시작한다.
1
2
3
4
5
6
7
8
@Component
class TestClient(private val client: WebClient) {

//	@PostConstruct 어노테이션을 주석처리해서 자동으로 실행되지 않도록 한다.
	fun letsDoThis() {
		// ...생략...
	}
}
coffee-client에서는 RSocket 서버에 요청을 보내기 위해 RSocketRequester를 사용한다. Bean으로 등록하자.
1
2
3
4
5
6
7
8
9
10
11
12
13
@SpringBootApplication
class CoffeeClientApplication {
	@Bean
	fun client(): WebClient {
		return WebClient.create("http://localhost:8080")
	}

	// 이 부분이 추가됐다.
	@Bean
	fun requester(builder: RSocketRequester.Builder): RSocketRequester {
		return builder.connectTcp("localhost", 8901).block()!!
	}
}
이제 외부에서 호출할 수 있는 Endpoint를 만들기 위해 Controller를 만들어준다.
1
2
3
4
5
6
7
8
9
10
11
12
13
@RestController
class ClientController(private val requester: RSocketRequester) {

	@GetMapping("/coffees")
	fun coffees(): Flux<Coffee> {
		return requester.route("coffees").retrieveFlux(Coffee::class.java)
	}

	@GetMapping("/orders/{name}", produces = [MediaType.TEXT_EVENT_STREAM_VALUE])
	fun orders(@PathVariable name: String): Flux<CoffeeOrder> {
		return requester.route("orders.$name").retrieveFlux(CoffeeOrder::class.java)
	}
}
이제 coffee-service와 coffee-client를 실행한다.
이번에는 coffee-client로 Coffee 리스트 요청을 보내면 RSocket을 통해 coffee-service의 정보를 전달해준다.
http :8081/orders/Kona를 요청해보자.
RSocket을 이용한 Stream이 연결되었다.
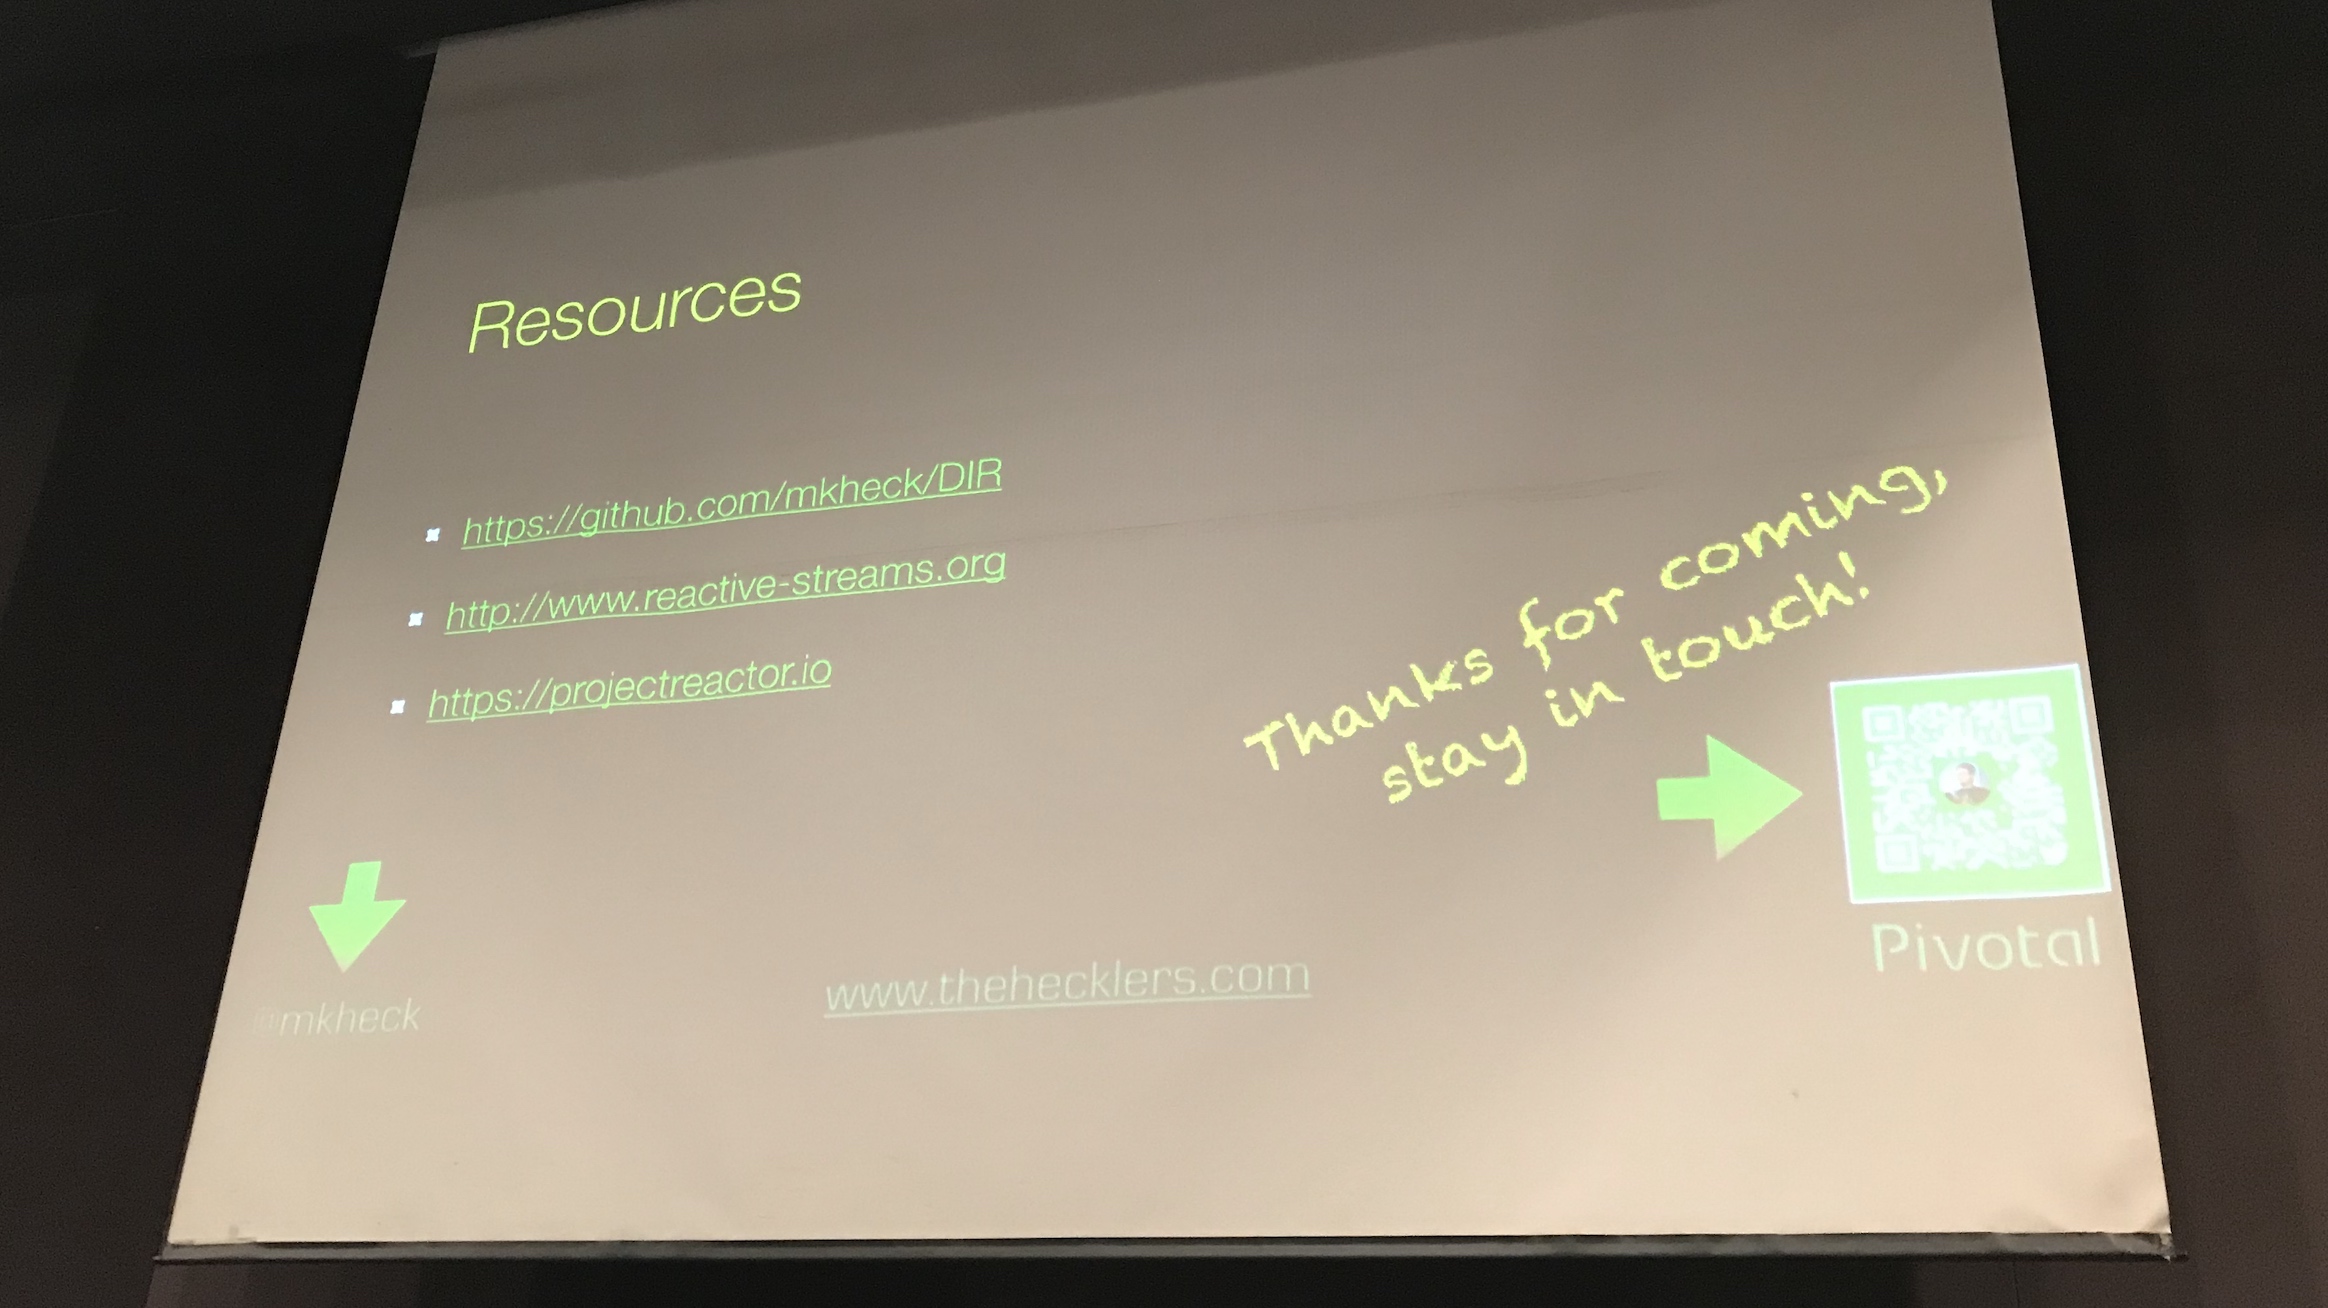
지금까지 진행한 소스코드는 아래 github에서 찾을 수 있다.
https://github.com/zealiard/diving-into-reactive
마크 헤클러가 제공하는 예제에는 R2DBC관련 예제도 있다.
최근 spring-data-r2dbc GA버전이 릴리즈 되었으니, 한 번쯤 들여다 보는 것도 좋을 것 같다.